Ever wanted to create your own 3D models for props or tabletop characters, terrain, etc? If you answered yes, then this Blender for 3D printed props and tabletop tutorial series is for you!

Blender is a fully featured 3D design tool with abilities ranging from regular CAD and sculpting all the way through to fully rendered movie-quality CGI animation.
Now, obviously, Z-Brush is highly regarded for sculpting minis, statues, action-figures, and other organic shapes, and I love ZBrushCore ($180~) but if you are looking for a completely free but pro-level do-a-bit-of-everything tool, then in my opinion, Blender is the one to check out.
Why Blender?

OK, I said Blender is the application I would choose, but why specifically?
- Blender is completely open and free (both in terms of freedom and beer).
- It works cross-platform.
- As well as the graphical interface, it has a powerful Python scripting feature.
- You can use primitives, parametric, sculpting, whatever style of CAD works for you.
- Renders realistic scenes, quickly – create photo-real mockups of your finished design!
- Bend and pose your characters using Rigging.
- Allows you to use modifiers for things like booleans and bevels, that impact the export, without making those changes permanent in your actual design.
While I love Fusion 360 and Tinkercad, it has to be said that for D&D/Tabletop hobbyists with 3D printers, Blender is the go-to CAD tool.
Why NOT Blender?
For precise, mechanical designs that need to fit and work together, Fusion360 or OnShape are still my choice. I would also use those if I need to output to CAM, for my CNC or laser etc.
Tinkercad is still the easiest and quickest to just throw together something quickly like playing with LEGO. I just wish Tinkercad had non-destructive booleans like in Blender, or a history undo like in Fusion 360!
Download and “Install” Blender
First you will need to download Blender from the website.

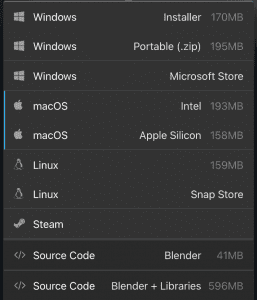
Windows 7 is no longer supported, but other than that it is super cross-platform.
A reasonably recent computer is needed, and as you would expect with a 3D design tool, the better GPU you have the nippier it will perform.
Unfortunately for me, when I was running on Ubuntu I could not get my machine to work correctly with either an AMD or Nvidia card, but when I get it working the workflow will feel a lot snappier on that machine!
Fortunately for me, unlike my previous Intel Mac, Blender on Apple Silicon seems very much at home.
Once downloaded you are ready to go, and once set up you won’t need an internet connection, which is great for working out away from your home/office.
A really neat thing is you can run it off of a USB memory stick or external drive!
The Blender UI
To get started, let’s just learn how to navigate the interface, because it can appear overwhelming when people first launch the application.


I know I was daunted when I first saw the application, it really does have an off-putting first impression. Just take it piece by piece and you soon get the hang of it, don’t worry.
The main area of the screen is the 3D Viewport.
What you see here depends on the mode you are in. The names are pretty descriptive so you won’t have too much trouble getting used to which mode is which. One thing that does sometimes trip people up is you can scale and move objects in Object Mode, you don’t have to edit them to move them around, size and place them. You can select from the Mode menu or hit the Tab key to switch between object and edit mode.

You can change your view of the scene using the widget in the top-right of your screen. Click one of the axis and the screen will shift viewpoint to focus on the selected axis. You can also click and drag to move the view around in smaller increments.
To pan around and change area in view, and the point where the axis rotate around, drag and hold the hand icon in the same way.
There is a magnifying glass icon for zooming in and out.
In the top right of your screen you will see the objects within your scene, and as you add objects the tree list will grow. You can name your objects to make it easier to tell them apart rather than generic “cube” and “cylinder”.
While you are there, delete the cameras and light, we won’t need them for 3D printing!

Controlling Blender

When you watch highly experienced people use Blender it is difficult to track what is going on because there are so many keyboard shortcuts, mouse gestures, and often, specialized USB controller widgets they use like some CAD version of laser harp wizard, Jean-Michel Jarre.
You can get there in stages, working up from the basics. Memorizing arcane incantations isn’t necessary to get productive with the tool!
Mouse Navigation in Blender
Ideally you at least need a 3-button mouse to make the most of Blender but in the preferences you can select to Emulate a three button mouse and then where you would normally drag around using the scroll wheel you can instead hold the Alt key.
- Left-Click — Select
- Alt-Left-Click — Select Edge
- Alt-Shift-Left-Click — Select and Add Edge
- Scroll Wheel-Scroll — Zoom in and out
- Scroll Wheel-Drag — Orbit the scene (or move/scale/rotate the object on axis when performing those actions)
- Shift+Scroll Wheel-Drag — Pan
- Alt+Scroll Wheel-Drag— Switch Axis View
Strangely, unlike every other program in the world, right click has up until recently been the standard used in Blender to select and move, but this can be changed to your own preference in the settings (see below). Personally left mouse button makes sense to me.
For tabletop/D&D stuff we won’t be making animations or videos usually, so I suggest making the Spacebar launch the Tools instead of the default which is Play.

So if one mouse button is for selecting, what does clicking the other do? It is used for context menus, and in the past it was used for setting the 3D cursor, which is something that will make more sense when we come to manipulating objects.
Commonly Used Blender Shortcut Keys
| Key | Function |
|---|---|
| ~ | Show Pie Menu |
| A | Select All |
| Alt-A | De-Select All |
| Shift-A | Add Object |
| CTRL-B | Bevel |
| CMD/CTRL-C | Copy Object |
| Shift-D | Duplicate Object |
| Delete | Delete |
| E | Extrude |
| F2 | Rename |
| F3 | Search |
| G | “Grab” to Move |
| H | Hide |
| Alt-H | Un-Hide |
| I | Inset (extrude then scale down) |
| CMD/CTRL-I | Invert Selection |
| K | Knife |
| CMD/CTRL-L | Select Linked Vertices |
| N | Show Transform Sidebar |
| O | Proportional Edit Mode |
| P | Seperate as New Object |
| R | Rotate |
| CMD/CTRL-R | Loop Cut |
| S | Scale |
| T | Tools Sidebar |
| CMD/CTRL-S | Save |
| Tab | Change Mode |
| CMD/CTRL-V | Paste Object |
| X | Delete or Constrain move to X axis if moving |
| Y | Constrain move to Y axis if moving |
| Z | Constrain move to Z axis if moving |
| Alt-Z | X-Ray Mode |

Numeric Keypad Entry
Again, while you can use the View menu, you will find having a numeric keypad more convenient when in the flow. If you have a numeric keypad. On a laptop etc, you can change to emulate one in the Input settings in preferences.
For example, the . (period key) on your keypad will reset your viewport to show the currently selected object. +/- will zoom in and out.

Views, Workspaces and Blender Panel Chaos
Blender has an eye-bleedingly busy UI, but that is partly where the productivity gains come along … eventually.
It is just so customizable.
Unlike many apps, where you fit into the developer’s way of doing things, Blender affords you a lot of freedom, but that freedom can make many people just plain confused. If you are not careful while clicking and dragging you might end up with a bunch of objects and panels you never intended to display.
If you are like me and find a cluttered UI distracting, you might want to do is delete workspace tabs that you don’t need, such as those for rendering or animation:
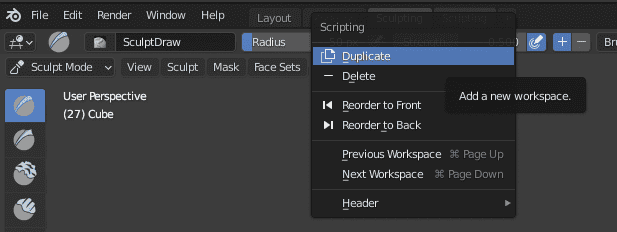
Fortunately, you can always get back to the default or add workspaces back using the + tab.
Blender User Settings and Preferences

As we are discussing tabletop, terrain and miniatures, one of the first things you will want to do is set your units of measurement. By default Blender works in Meters which is way scaled up from what we will be dealing with!
I set mine to Millimetres but if you are inhaling ready to shout MURICA!!! you can also set it to legacy units (inches) by selecting Imperial as your Unit System.
Regardless of units, for tabletop you are also going to want to change the Unit Scale because otherwise it will have your objects meter sized but expressed in your smaller units.
Also check out the Edit > Preferences, as a lot of the more annoying elements can be tweaked, right down to emulating a 3 button mouse or how the interface behaves.

Importing 3D Model STLs into Blender
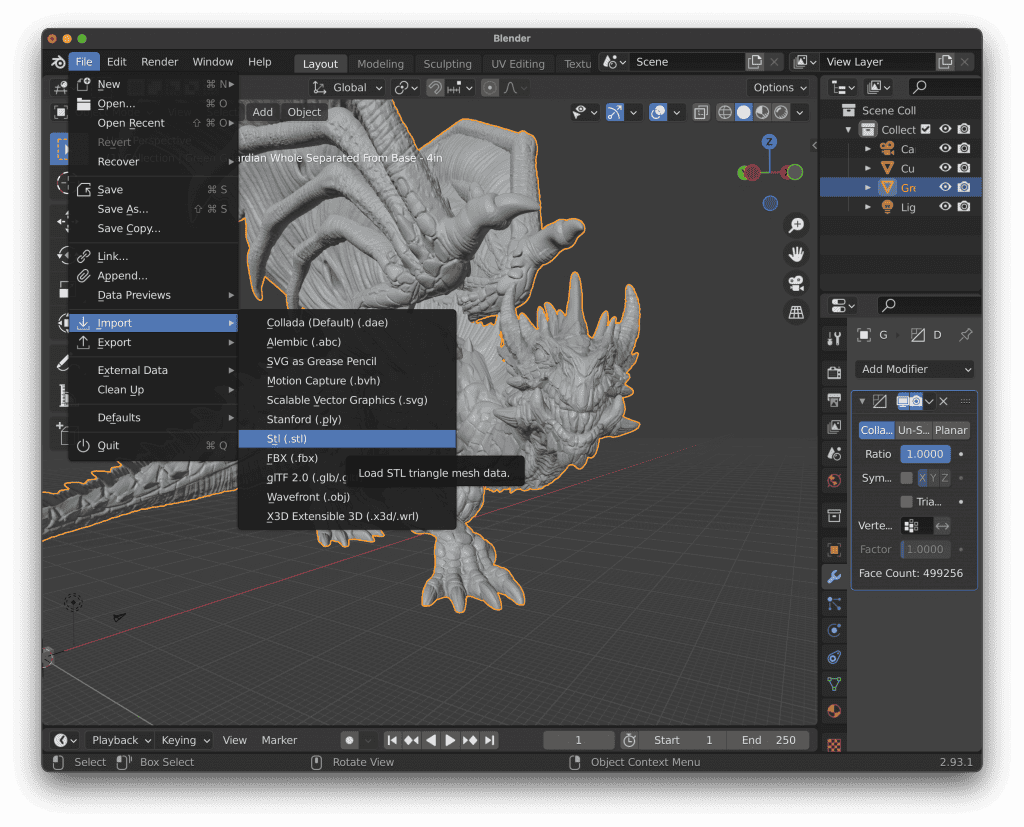
Using File > Import you can import STL files into Blender, and it handles highly detailed 3D models very well.
Once you find your feet with Blender you might find it better for digital kit-bashing than Tinkercad or Meshmixer!
Exporting Blender STL Files
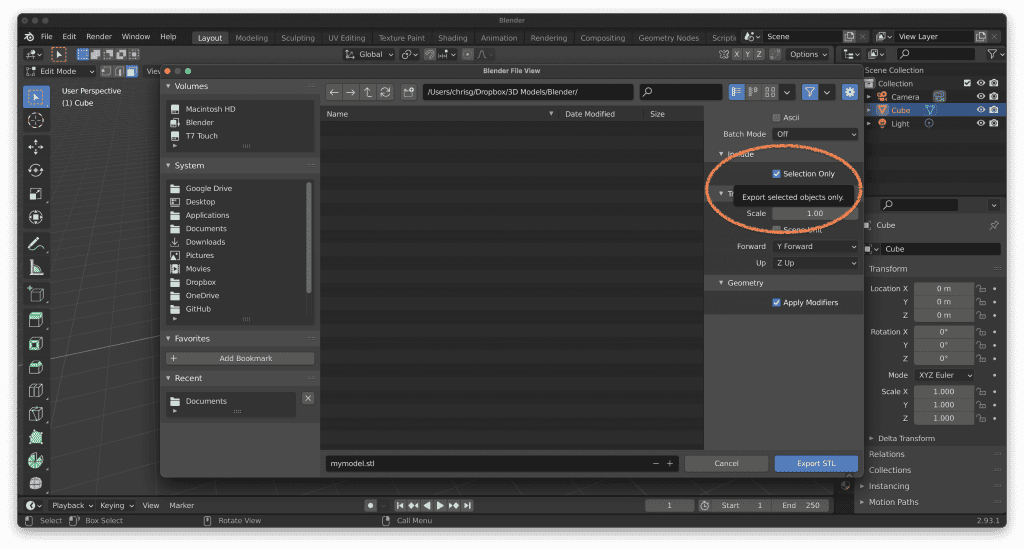
There is a built in STL export, plus optionally add-ons that offer more granular control. I quite like the built-in tool for a lot of jobs because it allows you to not make modifiers permanent, whereas from what I can tell the add-ons do.

If your imported, or sculpted, model gets too complex and your file sizes are getting out of hand, a useful tool is to add a Decimate modifier, that can simplify your model with largely unnoticeable loss in detail. The trick with decimate is to test and tweak. try different settings to get the sweet spot of detail and complexity.

One thing that could trip you up is this check box here, otherwise it will attempt to export your whole scene. Give it a filename and optionally tweak the resolution.
Where the 3D Printing add-on excels is finding and resolving issues with 3D models that could make a 3D print (or slicer) fail:


Blender Add-Ons
I mentioned add-ons above when discussing 3D printing, so I should talk about them now.
Blender is super powerful out of the box, and it also comes with a startling array of add-ons included in the preferences menu but not enabled. At the very least we will need the Official 3D Print Toolbox:

Another handy one supplied by the community is Bool Tools. Think of Boolean operations similar to the operations we can do in Tinkercad, where we add an object to another or subtract from an object using another shape to erase from it (or if you prefer, the 2D Pathfinder tool in Adobe Illustrator), but this add-on takes it to a lot more interactive level.
Next Up in Part 2 of the Blender Series
In the Blender tutorial part 2 we will create a simple scene and manipulate some objects, make sure you are subscribed so you don’t miss out!
