• Skip to main content
  • Skip to header right navigation
  • Skip to site footer
makerhacks-logo

Maker Hacks

Ideas, news & tutorials for makers and hackers – Arduino/Raspberry Pi, 3D printing, robotics, laser cutting, and more

  • Home
  • About
  • 3D Printing
  • Laser Cutting
  • YouTube
  • Free Arduino Course
  • Recommendations
  • Contact

Day 7: Lessons – Internet of Arduino Things

You are here: Home / 30 Days to Arduino Programming Course / 30 Days to Arduino Lessons / Day 7: Lessons – Internet of Arduino Things

There are a few options for connecting your Arduino Uno to the internet, and that is without considering the boards that have internet access built in.

Two options that we can look at right away are utilizing your existing computer’s internet connection (or a small computer that can take its place, such as the Raspberry Pi), and using an Ethernet breakout or shield.

  • Shields are boards that attach to your Arduino to give it new abilities or functions.
  • Breakouts are boards that you connect with wires that do the same or similar functions.

IFTTT via Processing

In this example, we use the Internet of Things automation service, IFTTT, via Processing.

We collect data from analog pin A0, send it to Processing over USB, and Processing calls the IFTTT webhooks service.

After that, you can tweet it, email, text, save it to a file in dropbox, and so on.

Don’t be too aggressive with your API calls!

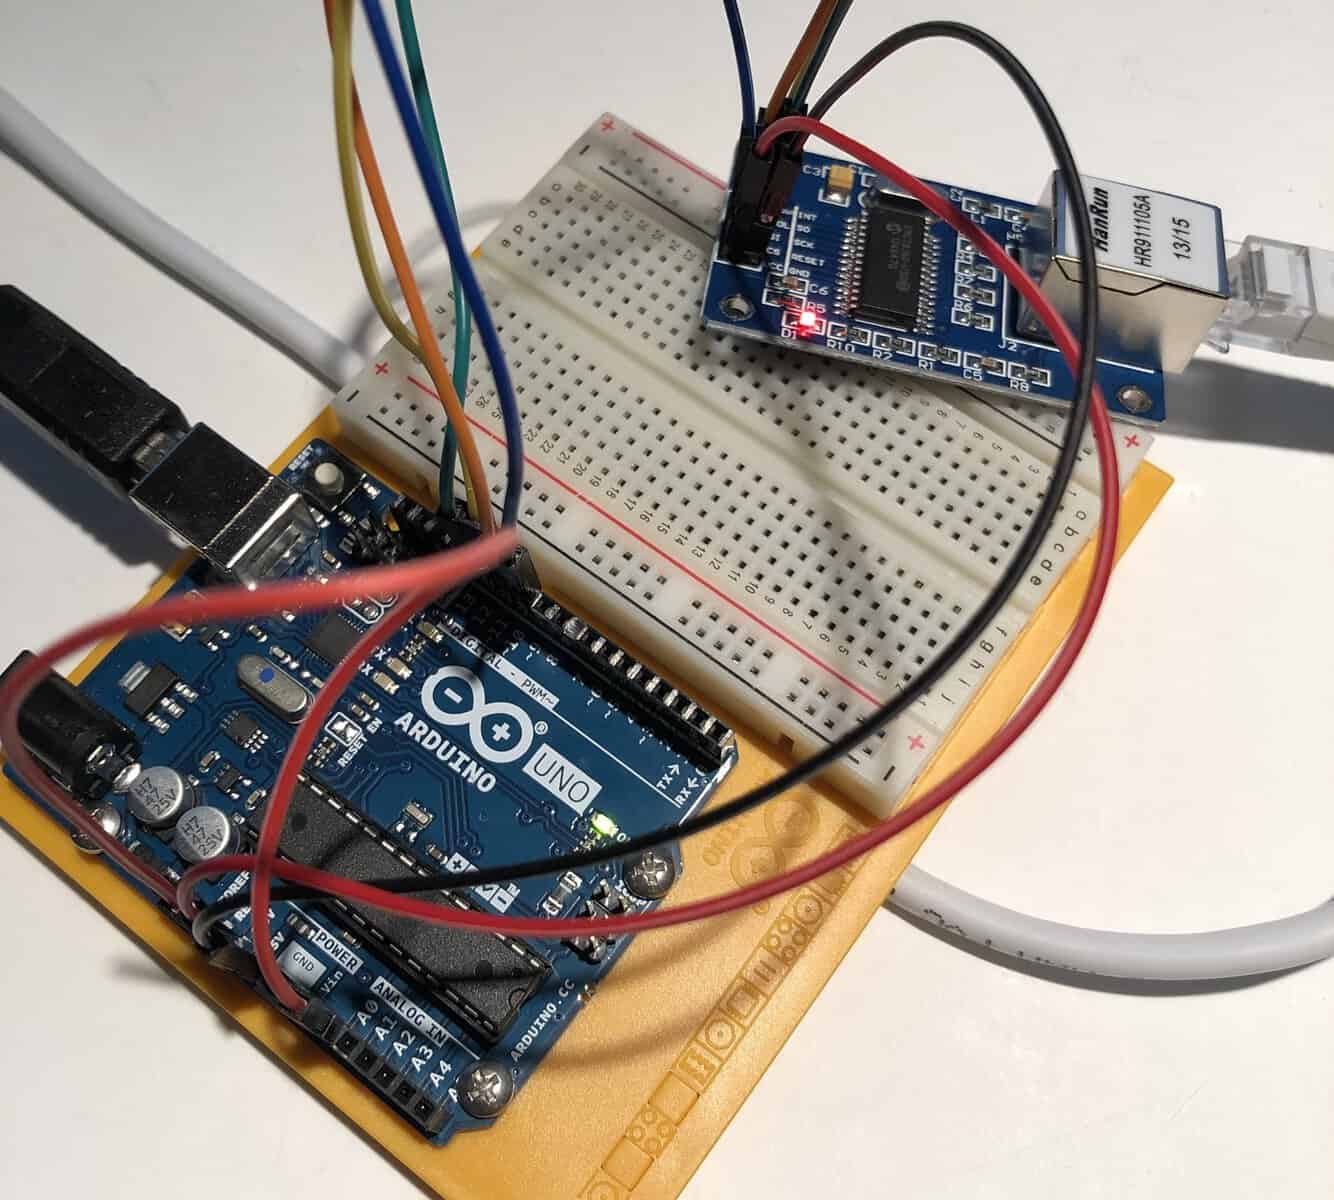
Ethernet Breakout

This example depends on acquiring a wifi shield or ENC28J60 breakout (I used the latter). They can be picked up on the usual places for around $3 or so.

   VCC -- 5V
   GND -- GND
   CS  -- D10
   SI  -- D11
   SCK -- D13
   SO  -- D12

Now, obviously, you will also need an ethernet connection, which might involve plugging into your cable/adsl router. We will get to wireless options later in this course. Using ethernet does mean less configuration, however – plug and play pretty much.

Arduino Web Server

Log Data to Thingspeak Service

Arduino Lessons

  • Day Zero (What is Arduino and Why Care?)
  • Day 1: Lesson 01 – Introducing Arduino
  • Day 1 Lesson 02 – Meet Arduino Uno
  • Day 1 Lesson 03 – Breadboard a Circuit
  • Day 2 Lesson 01: Arduino Web IDE and the Structure of an Arduino C Sketch
  • Day 2 Lesson 02: Hello World!
  • Day 3: Lesson – Fun with LEDs
  • Day 4: Lesson – Magic 8 Ball & Random
  • Day 5: Lesson 01 – Arduino/C Functions and Serial Input
  • Day 5: Lesson 02 – Variable Type Conversions and Serial Input RGB LED
  • Day 5: Lesson 03 – RGB LED Color-Picker
  • Day 5: Video for Today’s Lessons
  • Day 5: Lesson 04 – Spy Box Part 1
  • Day 6: Lessons – Reading Inputs
  • Day 7: Lessons – Internet of Arduino Things
  • Day 8: Lessons – Internet of Arduino Things Part 2
  • Day 9: Lessons – Magic 8 Revisited (16×2 LCD + Tilt Switch)
  • Day 10: Lessons – Tiny Night Light (Light Sensor and ATTiny85 Programming)
  • Day 11: Lessons – Arduino Chiptune Music
  • Day 12: Lesson – 8 LED Sequence using Shift Registers
  • Day 13: Lessons – Countdown Clock with 7 Segment Display
  • Day 14: Lessons – Time.h/Arduino Clock
  • Day 15: Lessons – Ultrasonic Distance Sensors
  • Day 16: Lessons – Going Wireless!
  • Day 17: Lessons – Send and Receive IR Signals with Arduino + LEGO Power Functions!
  • Day 18: Lessons – Controlling a Canon 7D using a Hacked IR Remote and a Transistor
  • Day 19: Lesson – Arduino Remote Control MP3 Player!
  • Day 20: Lessons – Wifi with ESP8266
  • Day 21: Lessons – Wifi Data Logger with ESP8266
  • Day 22: Lessons – Arduino, Bluetooth/BLE & Android/iOS/Mac/PC
  • Day 23: Lessons – How to create your own custom Android app to control Arduino over Bluetooth
  • Day 24: Lessons – How to create your own custom iOS app to control Arduino over Bluetooth
  • Day 25: Lessons – Controlling 2x Servos with an Arduino Analog Joystick input
  • Day 26: Lessons – Controlling DC Motors, and DHT22 Temperature Sensor
  • Day 27: Lessons – Motor Controllers
  • Day 28: Lessons – Arduino 28BYJ-48 Stepper Motor Control with the ULN2003 Stepper Motor Driver
  • Day 29: Lesson – Moving Your Arduino Project Off Your Breadboard
  • Day 30: How to make the most minimal Arduino/ATmega328 breadboard circuit
  • 3D Printing
  • CNC
  • Electronics and Hardware
  • Laser Cutting
  • News and Reviews
  • Software and Programming

arduino budget cad cnc diode laser glowforge Hacks Ideas laser cutter linux Makes making python raspberry pi resin Reviews technology tips xTool Lasers

.

Maker Hacks Blog Copyright © 2026 · All Rights Reserved · Privacy Policy