In this lesson we look at what makes an Arduino Uno work, and what makes it special.
In this article, we will explore the features and components of the Arduino Uno R3 board.
Arduino Uno R3 Features
- Digital pins: The board has digital pins which can be numbered and utilized for various purposes.
- ICSP programmer: The board has an ICSP programmer which is used to put the bootloader on the chip.
- USB and Power Jack: Arduino Uno R3 has a USB port and a circular power jack for power input.
- Analog inputs: The board has analog inputs which allow for graduated sensor readings, such as temperature and light intensity.
- 3V, 5V, and Ground: Arduino Uno R3 has pins for 3 volts, 5 volts, and ground to attach external devices.
- ATmega chip: The board is powered by an 8-bit ATmega ATmega328P microcontroller chip.
- USB-to-serial AVR chip: Arduino Uno R3 also has another AVR chip to handle USB-to-serial communication. Other compatible boards might use an FTDI or Chinese CH340 equivalent, but they all do the same thing which is help you communicate with the board via USB.
- Reset button: The board includes a reset button for restarting the program without physically removing the power input.
- LED indicator: There is a programmable onboard LED indicator that shows the status of the board.
- Printed information: The back of the board contains printed details about its design, assembly in Italy, and open-source nature.
Programming the Arduino Uno
The Arduino Uno R3 starts by looking for the bootloader in the onboard flash memory, which is responsible for then executing the user’s program or sketch.
This means we just need to upload our program over USB for the board to then run our custom software until we next want to change it.
Here are the steps to program the board:
- Connect the Arduino Uno R3 board to a computer using the USB port.
- Open the Arduino IDE (Integrated Development Environment) on the computer.
- Write or import the desired program or sketch into the Arduino IDE text editor.
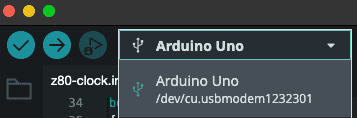
- Select the Arduino Uno R3 board from the list of available boards in the IDE.
- Choose the appropriate serial port for communication with the board. On Windows it might appear as a COM port, on Mac and Linux it will show as a device.
- Click on the “Upload” button to transfer the program to the board.
- The Arduino will reset and the program will be executed.
Remember to tie the ground connections of any external devices to the ground pin of the Arduino Uno R3.
Conclusion
The Arduino Uno R3 is a versatile board with many convenient components and features. Its digital and analog pins, along with USB and power jack, make it suitable for a wide range of projects.
Unlike some competing products, the onboard ATmega and AVR chips enable easy programming and communication without requiring any additional debugging or programming tools.