
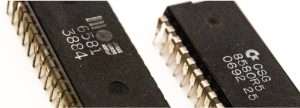
SID music players already exist for desktop computers, and of course on the Commodore 64, so why create one using an Arduino Uno?
During discussions in the Neo6502 community, we got to thinking about how to add great chip-tune capability to the device.
Naturally my mind went to how lovely it would be to add a SID (MOS 6581/8580) chip, but those guys are getting scarce and therefore expensive. There are FPGA and ARM based emulators, but they are also not cheap. What is the lowest power microcontroller that can do this?
Arduino SID Emulation
Digging around in Google I found a project that had managed to hack together an imperfect but working emulation of the SID chip using an Atmega!
His approach was to create C header files containing all the music, and compile it right into the project.
Download the Arduino library .zip file and uncompress it in your Arduino/Libraries directory:

Creating them is a bit of a faff so I included a clip of Commando.SID in the Github repo.
Converting SID music for use with this Arduino code requires first turning the tune into a dump file, and then converting that dump into a C header array:
- Extract SID music data from SID files using SID Dumper by Johannes Ahlebrand Windows application (not to be confused with the multi-platform SID Dumper)
- JConverter.jar is then required to convert dumped SID music files into C header files – this is abandonware, searching for JConverter now brings up a Joomla migration tool!
SID Player Arduino Code
Connect PIN 9, 10 + ground to your audio jack adapter or speaker.
#include <avr/pgmspace.h>  // Lib to store data in the flash rom
#include <SID.h>           // sid-arduino-lib: Brian Tucker 1-5-2015
SID mySid;                 // https://code.google.com/p/sid-arduino-lib/


// Our SID music file converted into a C header file containing an array
#include "commando_sid.h"  // SID register data file in flash memory

#define LED 13

// Non-blocking sleep function
void sleep(int sleep_time)
{
  long start_time = millis();

  while(millis() < start_time + sleep_time)
  {
    // do nothing
  }
}

// Once on boot
void setup()  {

  // Initialize the SID library
  mySid.begin();
}

// Main loop
void loop() {

  // Get the next SID register data and set in the SID class
  for(uint16_t sidPointer=0;sidPointer<=sidLength;sidPointer++){
    for(uint8_t sidRegister=0;sidRegister<=24;sidRegister++){
      mySid.set_register(sidRegister, (pgm_read_byte(&sidData[(sidPointer+sidRegister)])));
    };

    // Wait before moving the pointer forward
    sleep(19);
    sidPointer=sidPointer+24;
  };
}
Crunchy but recognizable tunes should emanate from your speakers if you wired everything correctly.
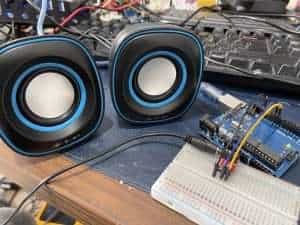
Unfortunately, even the Atmega328 has extremely limited memory, and the way this has to work is to force-feed the emulated chip with all the sound registers repeatedly, so it is a lot more memory intensive than the original C64 would have to deal with.
Still, for short clips it works!
Loading SID Files from SD Card
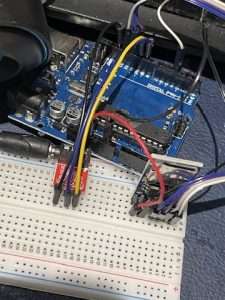
Then I realized that we could load as much bloated SID file data as we like if we stream it from SD card instead of compiling it into the Arduino code.
Rather than grab clips of C64 music I again used the Windows SID dumper but exported a couple of full-length tunes … they were 450KB!
Clearly no attempt is made to compress these things, but that makes it easier on our little Arduino when it comes to consuming that data.
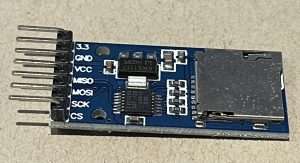
You will need an SD card reader breakout like the one in the photo.
In addition to the above pins, you will need to connect the SPI bus:
- MOSI – pin 11
- MISO – pin 12
- CLK – pin 13
- CS – pin 4
Then connect 3v power, Ground.
Reading Files from SD with Arduino
To read from our SD card we can simply use the SPI and SD libraries built right in to the Arduino IDE. We just have to tell the library which pin is the chip select, and in our case that is pin 4 because I followed the official example.
They provide convenient Open, Close, and Read methods, as well as being able to check Available() to see if there is data remaining:
#include <SPI.h>
#include <SD.h>

void setup() {

  Serial.begin(115200);
  while (!Serial) {
    ; // wait for the serial port
  }

  if (!SD.begin(4)) {
    Serial.println("SD initialization failed!");
    while (1);
  }

  File myFile = SD.open("test.txt");
  if (myFile) {
    // read until end of file:
    while (myFile.available()) {
      Serial.write(myFile.read());
    }
    // close the file:
    myFile.close();
  } else {
    // file didn't open, error:
    Serial.println("error opening test.txt");
  }
}

void loop() {
// nothing
}
Play SID from SD-Card
If you just want to boot and play a specific SID tune file, you can use this code.
Of course, you will need some SID tunes for your SD card, so I included some dumped files in a zip for your convenience (they will need to be extracted to the root of your SD drive).
Having to compile each time you want to change the tune isn’t much fun after a while, though.
I did consider making it so you can type a filename into the serial input (I am outputting the files found on the card to serial so could make sense), but instead I decided to just play a random tune from the files found in the root folder.
There are two downsides to this, one is the delay reading the list of files, especially if you have lots, and the second downside is Arduino is not particularly random when it comes to random numbers, even when providing a seed value!
We read the filenames, looking for “.DMP” to make our list (if you have more than 20 you will need to tweak the code). From this list we randomly select a filename and open that file.
All that remains for us to do is continually supply the 25 emulated SID registers with data:
myFile.read((uint8_t *)sidData, 25);
#include <string.h>
#include <SPI.h>
#include <SD.h>

File myFile;
File root;

/* Audio out: Connect PIN 9, 10 + ground */
#include <SID.h>
SID mySid;
char sidData[25];

String playlist[20];
char num_files=0;

// Non-blocking sleep function
void sleep(int sleep_time)
{
  long start_time = millis();

  while(millis() < start_time + sleep_time)
  {
    // do nothing
  }
}

// Print the contents of a directory
void read_directory(File dir, int numTabs) {
  while (1) {

    // Get next file entry
    File entry =  dir.openNextFile();

    // End of files
    if (! entry) {
      break;
    } else {


      // Is it a directory?
      if (!entry.isDirectory() && entry.size()>0) {

        // Filename
        String filename = String(entry.name());

        if(filename.indexOf(".DMP") > 0 || filename.indexOf(".dmp") > 0) {

        // Print the filename
        Serial.print(filename + " ");
        Serial.println(entry.size());
        playlist[num_files] = filename;
        num_files++;
        }

      }


    }

    // Done with this entry
    entry.close();

  }
}

// Open the file for reading:
int load_sid(char sid_file[14]) {

  // Load the file
  myFile = SD.open(sid_file);

  if (myFile) {
    Serial.println("OPENED file:" + String(sid_file));
    return 0;
  } else {
    // if the file didn't open, print an error:
    Serial.println("error opening file " + String(sid_file));
    return 1;
  }


}

// Once on boot
void setup()  {

  // Initialize the SID library
  mySid.begin();

  // Open serial and wait:
  Serial.begin(115200);
  while (!Serial) {
    ; // wait for serial port
  }
  Serial.print("\f\n\n");
  Serial.println("Initializing SD card...");

  if (!SD.begin(4)) {
    Serial.println("initialization failed!");
    while (1);
  }
  Serial.println("\n\nReading root directory ...\n\n");

  // Open root directory and display the results
  root = SD.open("/");
  read_directory(root, 0);
  Serial.println("Directory read.");

  // open random sid dump
  char chosen_file[13];
  for(int r; r < random(100); r++) {
    randomSeed(analogRead(A0));
    playlist[(int)random(0,num_files-1)].toCharArray(chosen_file, 13);
  }
  Serial.println("Loading tune " + String(chosen_file));
  int res=load_sid(chosen_file);

}

// Main loop
void loop() {


    // read from the file until there's nothing else in it:
    if (myFile.available()) {
      myFile.read((uint8_t *)sidData, 25);
      for(uint8_t sidRegister=0;sidRegister<=24;sidRegister++){
        mySid.set_register(sidRegister,sidData[sidRegister]);
      }
      sleep(19);
    } else {
      // close the file:
      myFile.close();
    }

}
Next Steps
As mentioned, there are a couple of things that make this less than convenient already, so rather than almost-sometimes-random on reset it could do with some kind of user interface.
Plus it is not portable so unless I can make it compact and run off battery, you might as well use a desktop app.
For the Neo6502 of course, it needs to be under control of the 6502 chip’s IO, and that is another project entirely!

 DIY Z80 Output to LCD: Homebrew Retro Computer Part 3