

Robotics and “STEM” kits are far from new. In fact, lots of us got started that way, though they were likely a lot more primitive and cumbersome to work with than what is available now. Outside of LEGO, nobody has really managed to get the full form AND function result we want.
CyberBrick is Bambu Lab’s entry into the field. It’s a modular electronics system for 3D-printed projects. The idea is you print a model from MakerWorld, add their solderless boards, motors/ servos, and drive it with a remote you also 3D-printed.
It is aimed squarely at getting more people into making things that move, and I’m very much all for that.
So with some scepticism, I bought the Beginner Hardware Kit with MakerWorld reward points. Yes, Bambu Lab has a rewards system where you can get free or heavily discounted stuff just for being a swell member of their community, uploading models and stuff.

I am not a Bambu Lab affiliate, at least at the time of writing! This is not a sponsored review, and Bambu might never see this article. I do earn a small MakerWorld commission if you buy the kit through the parts list on my SimpleBot model, though, and of course at no extra cost to you.
My goal was to find out two things:
- How easy it is to get going from opening the box through to getting something fun happening, and
- Whether you can realistically go beyond the official models and instead build your own cool stuff.
TL;DR: I like it, a lot, but there are many areas for improvement.
Getting started had more snags than it should have, but every problem thankfully had a workaround, and by the end of the second day I had designed, printed, and driven my own RC robot using nothing but the parts in the box. That is pretty neat, though there is an issue within that sentence staring us in the face that we need to address later.

Want to skip straight to a robot that drives? SimpleBot, the robot I built from nothing but the kit parts, is free on MakerWorld and prints in about two hours.
Kickstarted Origins

It appears that CyberBrick launched with a successful Kickstarter and then coverage seems to have ended. Outside of their own MakerWorld community, there is very little current news or energy around it.
While the product is clearly still made and sold as it was initially pitched, in terms of company support it does seem to be as much experiment as actual product line. The official push seemingly moved towards focusing on assembling complete toy kits rather than creating your own.
When I say the Kickstarter was successful, I mean by Kickstarter standards. Where backers might disagree is less talked about.
Bambu delivered the hardware that was promised, and it’s actually good. The damage came from communication issues, delays, and retail sales opening while many backers were still waiting for their deliveries. Ouch.
Even seemingly positive moves were argued over, for example when they covered the US tariffs, some non-US backers saw that as unfair. Several long-time Bambu buyers, including backers of the original X1 Kickstarter, were so burned by the whole thing they said they’d never back Bambu again, and even some claiming to have sold their printers in disgust.
Goes to show crowd-funding isn’t always the best way to establish a new brand with an enthusiastic and engaged community!
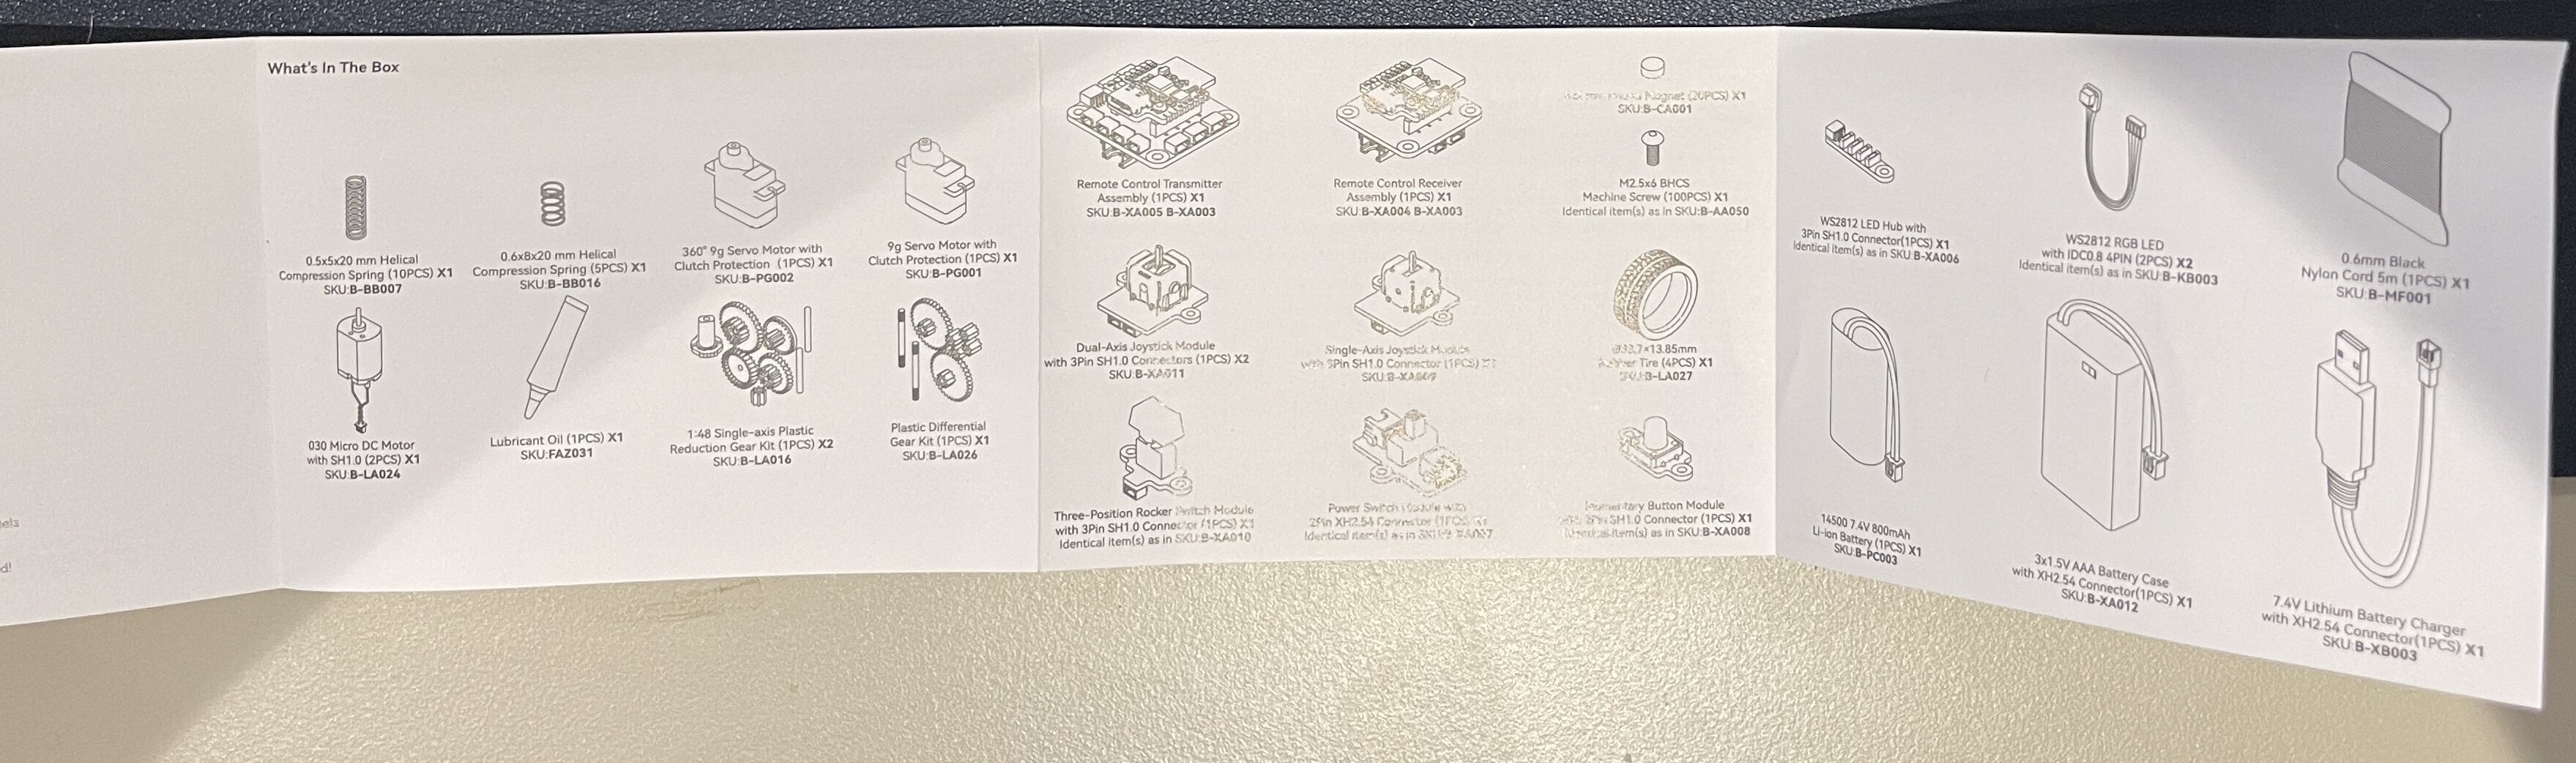
CyberBrick Beginner Kit: What you get

The Beginner Kit (ZK004) is £37.99 at full retail price, but I have seen it on sale for about £27. Basically, you get enough for one official vehicle and one remote:
- Two core boards, based on the ESP32-C3. One for the remote/transmitter, and one for the vehicle/receiver.
- A transmitter shield and a receiver shield. These are where you plug in the inputs and motors, plus attaching them identifies what each core does.
- Inputs: Two dual-axis joysticks, a single-axis stick, a three-position rocker, a power switch, and a momentary push button.
- Motors: Two 030 micro motors with 1:48 reduction gear sets, and a differential gear kit, plus four rubber tyres.
- A 180-degree servo and a 360-degree servo
- An LED hub and addressable RGB LEDs
- A 7.4V battery with a USB charger, and a three-AAA battery box for the remote
- A bag of 100 M2.5 screws, plus magnets, springs, grease, and cord/thread.
What is not in the box is even one USB-C data cable. The battery charger has a USB plug on it, and it’s easy to mistake it for one. You need a proper data cable, not a charge-only one, or the board powers up but never appears in the app.
You also do not get any nuts for the screws, which feels a little odd.
I guess it is less surprising that you only get the one rechargeable battery, but not including batteries for the remote seems a bit cheap.
My most shocking omission is how few LEDs you get. Something else we will return to.
If you want the kit, the easiest route is the parts list on my SimpleBot model, which includes a link to the correct Beginner Kit.

Getting started, and where it went wrong
Bambu folks are usually pretty good with making things friendly, so the lack of onboarding and tutorials seems really weird. They do point you to stuff like a wiki, docs, and assembly guides for the MakerWorld projects, but nothing feels as joined together as you would expect from the brand.
When you open the box, what you see is the parts in little baggies plus a tiny printed parts list. Knowing this whole thing was originally a Kickstarter, it seems they didn’t improve the unboxing beyond what people who backed the crowdfunder and knew what they were expecting would appreciate.
This is the part I most need to write, because each of these problems delayed me getting to the fun stuff, and none of them is documented well so far as I can tell.
Rough Edges
Both boards show up as the same thing. When you connect them, the remote and the vehicle both appear as RC_MODULE. That confused me until I realised they are the same core board running the same firmware. The shield underneath decides whether it is a transmitter or a receiver, so they only find out what they are once they are plugged in. You can rename them, and I advise you to do so.
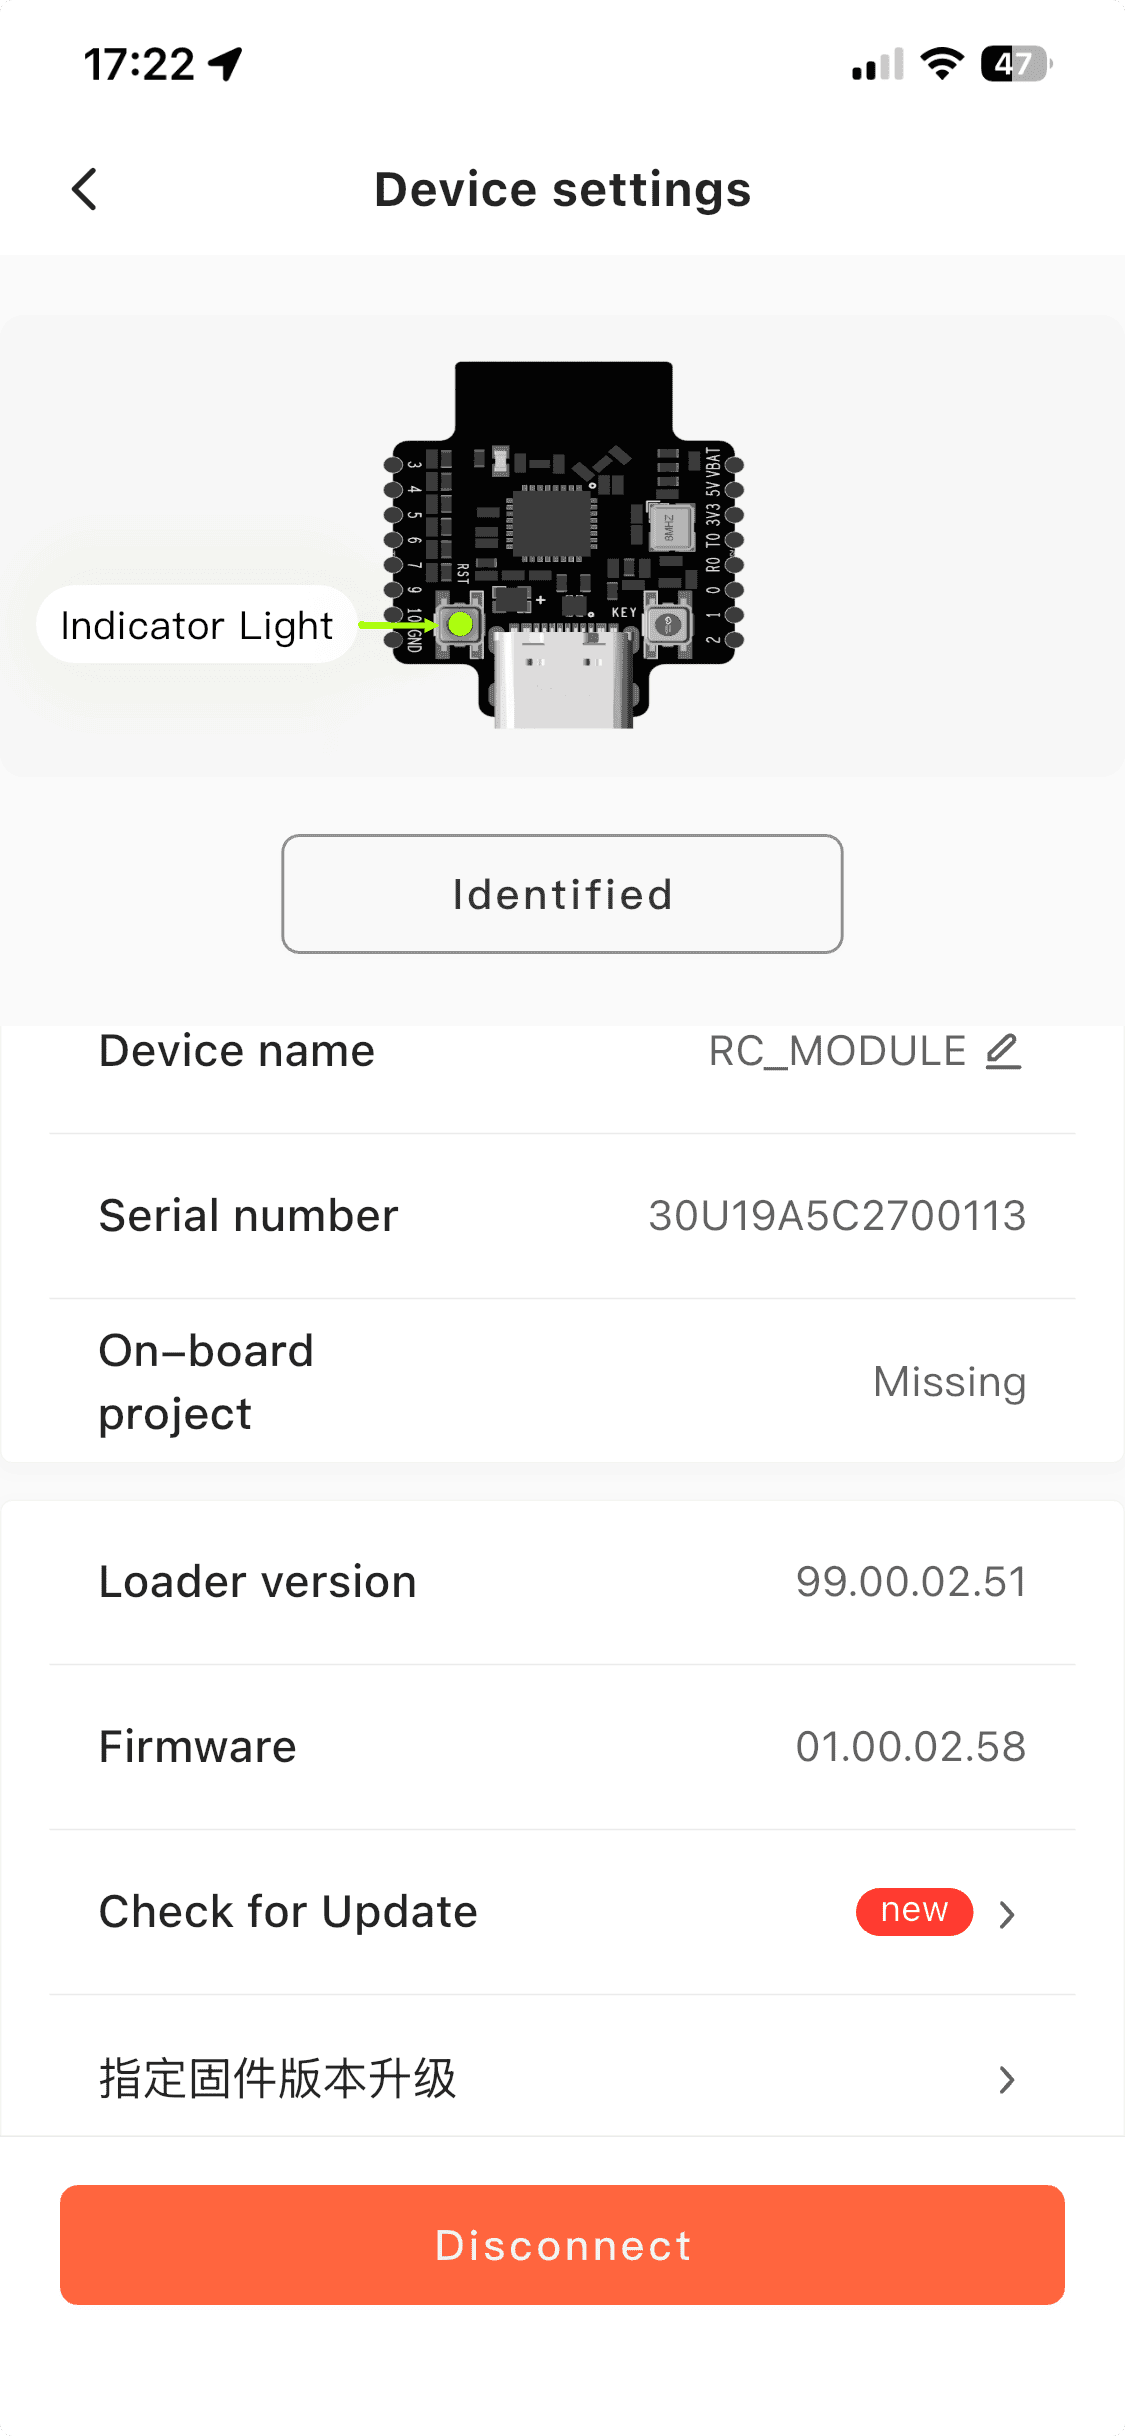
The firmware update would not work from my Mac. The desktop app failed instantly, every time, with no progress bar. I swapped cables and tried a different port before figuring out that the update request was being rejected by Bambu’s server, not by my Mac. The phone app updated both boards the first time, over the same WiFi connection. If the desktop app fails for you, use your phone.
The phone keeps the connection only while it is given focus. Switch out of the app, and the status LED goes red, I guess because iOS drops the Bluetooth link in the background. Keep the app open and front and centre while it works its magic.
Not just the motors, nothing on the vehicle/receiver side works from USB power. With the receiver plugged into my computer, the motors, servos, and even the LEDs stayed off. Everything on the receiver shield runs from the 7.4V battery, and USB only powers the core board itself. The same applies to the Test buttons in the app, which is confusing, because it looks like the test is failing. Plug in the battery, and it all springs to life. The remote runs happily on USB power alone. This is quite a difference to the Arduino breadboard-and-test-first type of workflow.
AAA batteries are bad. As mentioned, you can run the remote on USB-C, which is fine, but most remote case designs are for use untethered; they don’t tend to have USB cable holes. Other owners report that rechargeable AAAs soon dip below required power levels. That is because rechargeables offer 1.2V per cell versus the 1.5V the remote needs, so use lithium AAAs, or purchase another 7.4V pack, if you want it cordless.
Finding the code is not obvious. The control setup for each official model does not come listed along with the prominent print files section on the website. Scroll down and look under Files & Guides for CyberBrick Files, where there is an Open in CyberBrick App button. Going from the app makes it easier but this is not really explained anywhere so far as I can tell. Once you get the config .JSON file, the apps understand what goes where and which events trigger which action. The only in-app programming is the MicroPython plain text box with no placeholder text, help hints, or comments I discuss later. I was expecting a Scratch-style block programming system or something, but it is either “Turn on LED” or “here’s a code input box, go to town!”.
Buttons that are part of assembly instructions but do nothing. I understand the remotes are largely meant to be generic, but you are told to construct things that do nothing a lot of the time. On the SoccerBot, for example, the rocker switch on the remote is not broken: the official control setup simply does not assign it to anything. You can see this in the app’s control editor, and you can give it a job yourself, but making the app give feedback when an attached input is activated would be more user-friendly.
CyberBrick unboxing and getting started experience: B-
Remember that “by the end of the second day” in the TL;DR? That is a problem, right there. Two days is ok for a maker who enjoys troubleshooting, but this is sold as a beginner kit.
Imagine getting this for your kid for their birthday or Christmas. How soon can they play with what you got them? If you were hoping the answer is “right away”, or even “same day”, then sorry to say there is not much chance of that unless you already did the build beforehand. That saddens me, because building should be the fun part, and instead the updates, the config hunting and the long prints all come before you really get into it.
Notice these delays were aside from how long the prints take. Some of the projects are multi-day print marathons. Others would take hours and hours just to get a working remote plus something that moves under your control.
Yeah, about the printing
So yeah, the official models look great fun, but they are not quick prints. The SoccerBot alone is about 6.4 hours of printing, which is a long wait for anyone when you have a new kit burning a hole in the desk waiting to be played with.

For the remote, I skipped the official one and printed the Simple Remote Plus+ from MakerWorld instead, which took just over two hours and works fine.
If there is one thing I would change about the onboarding and getting started experience, it would be a quick, simple first model, something you can have fun with in a couple of hours or maximum in an evening. More on my solution to that below.
Programming the CyberBrick with MicroPython
Out of the box, you configure everything in the app. As I mentioned before, there is no block-based code, no flow diagrams, just buttons and drop-downs.
You bind a stick to a motor, or set up rules like “when this stick is pushed forward, flash the lights red“. It doesn’t encourage you to do anything more than that, either. Each rule has a Test button that fires it on the real hardware. There are no loops, logic branches, or variables, but for driving things around it covers the basics.

There is a Code (BETA) option that lets you run a snippet of Python. It is a blank box with a 2,048 character limit and no examples, so you are on your own there. Something I hope to address on this website!
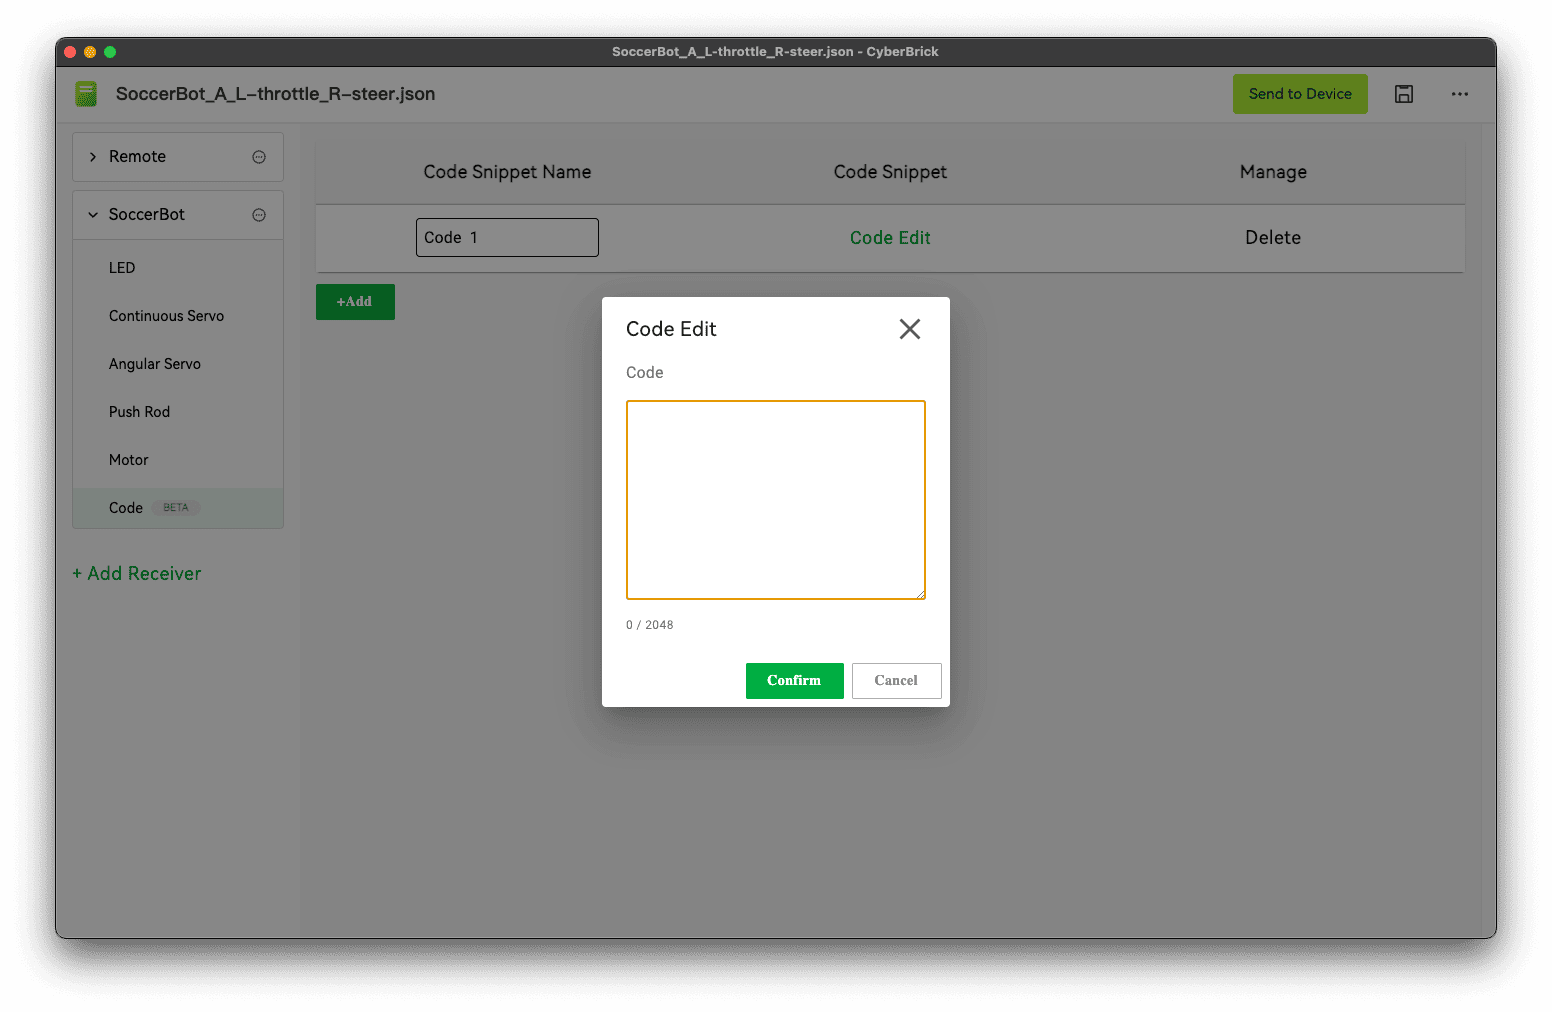
Underneath it all, it is MicroPython running on an ESP32. The board runs its control loop on startup from boot.py, and if you connect over USB and press Ctrl-C, you can take over and run your own code.
Bambu’s guide suggests installing VS Code with a plugin, which is fine but a non-starter in most classrooms and even some STEM labs, where you might not be allowed to install software. I found out there is a web-based tool called Viper IDE that might work instead.
Even Arduino has a cloud-based environment as an option, so this seems a huge misread of their intended market.
A CyberBrick MicroPython tutorial is on its way. To get it first, join the newsletter or subscribe on YouTube.
ESP32 Board
The ESP32 part of the CyberBrick has some caveats, so it is worth managing expectations. It is an ESP32-C3 to be precise. First, the C3 isn’t the ESP32 you might be thinking about, for example it can’t act as a USB human interface device (HID), such as a keyboard or mouse. Second Bambu Lab have stated they limit certain code libraries or features.
- The firmware is locked down. In February 2026 an experienced ESP32 developer tried to run their own C++ firmware and found the chip has flash encryption and secure boot permanently switched on at the factory. This means you can’t flash your own firmware! The only programming option is MicroPython running on Bambu’s firmware.
- Coding support is thin. Users report you can’t pass a variable between code snippets, so one user worked around it by storing values inside the global motor controller object.
- Progress is hampered by things being locked down. Community members have to fight against standard features that are missing that do not need to be. For example, why is it so hard to have inputs AND outputs on either the receiver or transmitter? It should be so easy to have an RGB LED change colour on the remote when a switch is in one position versus another, but they seem to have designed everything to avoid that simple thing being implemented!

Gearbox and wheel – My first CyberBrick project
Back to the hardware, and my first surprise was the motors. I expected the classic cheap robot setup of two yellow TT gear motors with wheels, and a flat chassis, but the kit does not include TT motors. Instead, the kit supplies two small DC motors and accompanying packages of 1:48 gear sets. The end results are very close to the same thing. The output shaft even takes a standard TT wheel, but getting to the point where most kits start isn’t so direct.
With that in mind, I designed a TT-shaped gearbox project to hold the kit’s motor and gears, supplying the standard TT mounting holes in the right places. It took three rounds of test prints to get a good fit (on my P1P at least).
The full gearbox-with-wheel assembly for the Bambu kit’s included motors, gears, and tyres is now on MakerWorld as a free model.

If you are interested in designing your own parts, you might also be interested in how I made my first MakerWorld Customizer in OpenSCAD.
Strangely, you can get the yellow pre-built standard setup from them, just not in the beginner’s kit where you would expect it to be more of a “plug and play” experience.
My CyberBrick Robot: SimpleBot
Next, I took my working gearbox and wheel designs, and I built a working robot around them. Yeah, there are official and community-supplied designs, but they are all overbuilt for a first “just get something working” project! I didn’t want to spend extra time printing projectiles, launchers, fancy go-faster stripes, tank treads, and such, just something that would move when I asked it to.
SimpleBot uses only parts from the Beginner Kit, prints on one plate in around two hours on my P1P at 0.2mm layers, and builds in one sitting.

To keep within just the parts that come with the kit, it skips the usual ball-bearing or caster wheel in favour of a modular detachable sled at the front. It drives with the left stick for speed and the right stick for steering. It drove the first time, well after I recharged the 7.4V battery, which, after two days of troubleshooting, was a very nice feeling.
These builds had their own lessons and side-quests, of course. The first set of wheels fell off because the hub did not reach far enough onto the shaft, and I had put screw holes where no screwdriver could possibly reach.
Both of these and other bugs are fixed in what I published, but I would appreciate any other issues being commented under the project at MakerWorld so everyone can benefit from iterations.
CyberBrick for STEM and education
For learning, CyberBrick has a lot of potential. There is no soldering required; everything plugs together using pre-made wires with connectors, and the app is simple enough anyone can get something moving without any code at all, depending on the quality of the build guides they follow.
Building a gearbox from loose gears and pins is unnecessarily fiddly, with small parts to bend, break, or lose, but I have to concede that it is also a valuable lesson in how gearing works. You see the 1:48 reduction in action after assembling it piece by piece.
The weak point for classrooms is a symptom of the beta-feeling ecosystem. It’s admittedly new, but also a year plus on from the Kickstarter and it doesn’t seem to have matured very much yet.
The desktop app gave me the most trouble, the recommended programming set-up needs third-party software installing along with additional extensions, and there is no easing in with block-based coding such as you might get with LEGO, micro:bit or mBlock. A browser IDE would get around much of these problems, and I would love to see Bambu work on that.
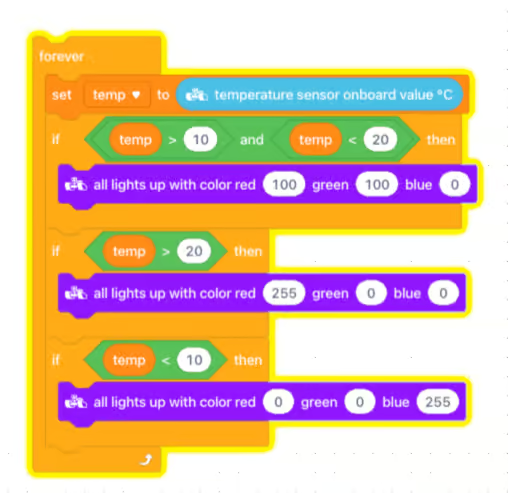
The closest thing to blocks that I know is a community project, Singular Blockly, which adds drag-and-drop coding for CyberBrick, but it is also based around VS Code and built as an extension, so it has the same install problem.
Another aspect to the ecosystem that they could solve much more quickly is their lack of sensors and actuators. Take a look at the robot designs, and you start to notice some popular themes by their absence. No line-followers, no collision avoidance, no motion detectors, no displays of any kind, just RC vehicles.
I understand their business desire to lock in customers, but opening up the CyberBrick to established players’ components such as Grove, Qwiic, and STEMMA QT would make a huge amount of sense if the customer’s needs were at the forefront of decision-making.
Price and Value
Compared with an AliExpress-style Arduino robot kit, CyberBrick is admittedly on the expensive side, and others in the Reddit community say the same thing. But that is not really a full and fair comparison. Against the premium education-focused brands, it is not outrageous, and you are paying for parts that will plug together with no soldering, an app that works without code, and maybe a steady supply of models to print.

I would say they could work harder on perceived value for money. For one example, showing they don’t know kids very well, you only get a few wires, and they will get lost and damaged due to their tiny and fragile nature. They use JST SH 1.0mm plugs, and pre-crimped leads cost pennies, so why not put a bag of extra spares in the box? Beginners shouldn’t be expected to know what an SH 1.0mm lead is, let alone have some lying around. If you already have the kit, a pack of pre-crimped SH 1.0mm leads is a cheap insurance policy.
Me saying “perceived” is intentional because they could add a lot more education and friendliness without anywhere near the ding to their profit margins. Either they should hire staff with an education role or use their existing incentive points system and incentivise the community! That said, they are not known for their openness and collaborative bent as a company, are they?
What I would like to see in CyberBrick version 2
If I had the ear of Bambu, which I don’t obviously, I would suggest some relatively simple improvements that would take their ecosystem far higher in usefulness, value, and esteem:
More components. The biggest limit right now is the range. There are motors, servos, and the individual wired LEDs, but there are no sensors, no displays, and only the two expansion boards (transmitter and receiver boards). Line following, obstacle avoidance, LCD displays, and such are the bread and butter of beginner microcontroller builds and robotics clubs, and there is nothing for them yet. I would especially like more choice for LED projects because the ecosystem could easily embrace WLED LED users.
Compatibility with Grove and friends. CyberBrick’s small 3-pin connectors are the same family as Qwiic and STEMMA QT, and not far from Grove. Official adapter cables would open up hundreds of existing sensor and display modules overnight. That would be a huge step up. Supporting M3 hardware as well as M2.5 would be another, since M3 is what most maker kits and TT motors use.

Home automation. Even IKEA is getting into the home automation game, but Bambu Lab have an ESP32 based microcontroller that seems to be actively avoiding the whole field. They sell lamps, night lights and other home projects, but none of them are CyberBrick integrated. Their own LED puck lights in Maker’s Supply come with a cheap infrared remote instead, and Bambu don’t sell anything to send those codes. In fact they now have three separate electronics ranges, CyberBrick, the 5V lighting parts and prop kits, and none of them plug into each other. On the Bambu forum one owner says a Home Assistant bridge works, but nobody has published how. I plan to have a go, so watch this space.
More official projects. I am surprised Bambu don’t routinely release more models of their own. Perhaps the plan is for the community to fill that gap, and MakerWorld does reward creators for CyberBrick models, so that may be the better route. Plenty of owners are asking for projects that are not vehicles, and the most popular community builds so far are things like a water cannon and even a fairground ride.
Laser frustration, which is not strictly about CyberBrick. Without a Bambu laser I can’t contribute laser-cut parts to MakerWorld projects, since those files need Bambu’s own laser format. I understand why, they want settings that are tested, but it leaves owners of every other laser brand out of things.
Bambu Lab CyberBrick Review Conclusion
CyberBrick is a lovely way into 3D printing projects that do things. It is, however, a way off being a must-try recommendation.
What I liked
- No soldering: everything plugs together
- The app gets something moving without any code
- Designing your own models around the kit parts is provably achievable
- Assembling the gearbox is a real lesson in how gearing works
What needs work
- A slow, poorly documented first day, especially the desktop app
- No sensors, displays or official block coding
- Firmware locked to Bambu’s MicroPython
- Stingy amount of leads and LEDs in the box
The first day experience has more speed bumps than it should have, especially over a year from launch, mainly around the desktop app but also around the entire getting started process.
None of the issues are a dead end, and I hope my coverage will save you from stepping in some of them. Once you have your head around how things work and everything is updated and communicating, it is pretty easy to go beyond the official models and even design your own, which is exactly what a kit like this should encourage.
It definitely needs more parts, especially sensors and displays, otherwise the kind of projects that can be shared are artificially limited.
They would benefit enormously from getting it to work with the modules makers might already own. If Bambu folks do keep expanding their range, this could become one of the default ways people get into robotics with a 3D printer.
I will be sharing more CyberBrick projects, and am working on a follow-up tutorial focused on the Bambu flavour of MicroPython code to get the CyberBrick to do the things the app by default can’t.
Both of my first projects are up on MakerWorld now: SimpleBot, which comes with a control setup for the CyberBrick app, and the TT gearbox and wheel it is based on. If you do not have the kit yet, you can find a link to it in the parts list on the SimpleBot page. Buy it from there and MakerWorld rewards me a small commission, at no extra cost to you.

What would you build if CyberBrick had sensors? Were you able to follow my assembly instructions? Have ideas for enhancements? Let me know in the model comments, and follow me on MakerWorld to see the next CyberBrick projects as they land.

 Makera Z1 Pro Review: A Desktop CNC That Can Live in Your Home