

Custom keyboards are keyboards that you either build or heavily modify yourself.
Just as a Jedi needs to build their own lightsaber, to be a fully-developed nerd you need to have hand-crafted your own custom keyboard.
Not really, but it does seem to be a popular right of passage for many geeks out there.
Over the next couple of tutorials we will look at mechanical keyboard customization options, why you would want to even do this, what it entails, and the different routes you can take.
First, what are we even talking about?
Custom Mechanical Keyboards TL;DR
A custom mechanical keyboard is exactly what it sounds like, but with a twist.
What Exactly is a Custom Keyboard? Custom keyboards are unique to you. They are keyboards that people tailor to provide a personalized typing experience by customizing aspects such as the layout, switches, keycaps, and even the firmware.
A mechanical keyboard just means it uses mechanical switches instead of a membrane.
People make keyboards that suit them ergonomically (for hand-cramp or accessibility reasons), and aesthetically (for example, to match their decor, preferences, or sports team).
But the options with keyboards go beyond that.
Everything about your keyboard is customizable.
I was going to say almost everything, but I can’t think of anything right now that you can not change to your liking …
This world of opportunities to tweak, customize, personalize, and stand out, has made keyboards a hobby and a community all of its own.
Why Create a Custom Keyboard
If you are not thrilled by the idea of your keyboard representing you, or being unique to you, then why might you consider getting your own just-for-you keyb?
- Feel – There are several categories and types of switches and keys that impact the experience of typing, varying in how hard you need to press, the amount of travel, and if there is a physical click when the switch is engaged. You will also notice Apple goes for low-profile keys with very little height to them, other keyboards have an almost paper like texture, and so on.
- Optimization – Touch-typists and gamers also find they have different needs when it comes to keyboards that might not be optimal in store-bought options. Some keyboards are, on the other hand, optimized for space-savings and compactness.
- Sounds – Anyone who has worked in a corporate open-plan office will recall the sound of typing. Some keyboards have a nails on a chalkboard cringe effect, others are almost soothing. I do like a loud thonky keyboard, and have a peculiar fondness for the old IBM keyboards from back in the day that were built for typing and hand-weilding into battle. My wife prefers absolute silence. Sharing an office with her was … an adjustment.
- Layout – Keyboards can be in all shapes and sizes, ranging from the traditional long board with area for cursor keys and a full numerical keypad, to cut-down minimal, split left and right hand keyboards, and specialist keyboards with just the keys that you need and no more (eg. I made a keyboard with just two keys, enough to quickly get out of Zoom calls).
- Widgets and Gadgets – In the past, a keyboard might only tell you when caps-lock is on, but now they can integrate screens that display all kinds of information, and graphical animations. We also commonly now see backlit keyboards, or even color effects. Are you looking to control your speaker volume via your keyboard? Perhaps you want to quickly scroll around your video editing timeline or fade between two tracks?
- Connectivity and Power – Do you need USB-C? Bluetooth? Wireless USB? Or maybe you need to connect to an old-school PS/2 socket? Does the keyboard also require a USB hub, say, to attach a mouse? Does it need to be rechargable?
Keyboard Parts: What You Need
Building a custom keyboard doesn’t have to be difficult or complicated, and the process usually follows one of several popular approaches:
- Take an existing keyboard, or kit, and customize within compatible parameters. These are usually pre-programmed and software custimization is limited to the options provided by the manufacturer, but you can very often change the keycaps, and you can look for the “hot-swappable” switches feature that requires zero soldering.
- Pick and select off-the-shelf parts to essentially create your own kit.
- Create something entirely custom, perhaps hand-soldering, and handling the programming or customizing popular keyboard microcontroller firmware.
Many people start with option 1 and stay there, happy with their tuned experience. For myself, I started with option 3 and in doing so I also found an option 2 that was very inexpensive and I am happy with.
More on those later.
Essential Keyboard Components and Tools
Essential tools for building a custom keyboard include an electronics screwdriver set, keycap and switch pullers.
Of course if you are going to be soldering then you need a variable power soldering iron and solder to go with it.
Key components of a custom keyboard include a circuit board, switches, keycaps, stabilizers, a case, and firmware:
- The circuit board, either hand-wired or Printed (PCB) acts as the foundation of the keyboard, wiring up and physically supporting the switches, and in turn the keycaps.
- Switches are the mechanical buttons responsible for registering key presses. They come in various types (eg. tactile, linear, and clicky), each offering different levels of physical or audible feedback and characteristics.
- Stabilizers (or ‘stabs’) are for larger keys such as wide space bars, and they stop them going wobbly.
- Keycaps are the covers placed over the switches, providing the tangible surface when you are typing. They come in different materials such as ABS (Acrylonitrile Butadiene Styrene) and PBT (Polybutylene Terephthalate), and each has its own feel and durability.
- Cases can be many materials, from 3D printed through to artisinal wood carving. Different people have different preferences, but you always need it to have a certain amount of robustness, and obviously it shouldn’t slip around when you are typing. You can tweak the audio characteristics of a case by padding out the insides with foam and tape.
- Firmware is the code that is written to the keyboard’s microcontroller to interpret keypresses and transmit the correct signals to your computer via USB, PS/2 connection, or bluetooth. Popular open source firmware options for custom keyboards include QMK (Quantum Mechanical Keyboard), and KMK (a similar firmware but written in the interpretted Circuitpython language).
Choosing Your Keyboard Layout
Keyboard layouts define the arrangement of keys on the keyboard, including the size, shape, and positioning of keys.
Popular layouts include ANSI, ISO, HHKB (Happy Hacking Keyboard), and ergonomic designs like split and ortholinear layouts.
Difference between ANSI and ISO Keyboard Layouts
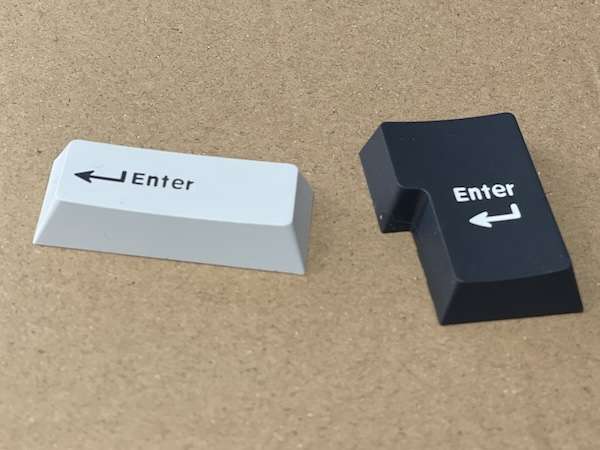
ANSI (American National Standards Institute) and ISO (International Organization for Standardization) layouts are standard configurations widely used in the United States and Europe, respectively.
They mainly differ in the placement and shape of keys such as Enter, Shift, and Backslash.
If your Enter key is a chunky upside-down L-shape then it is likely ISO.
There seems to be more availability of ANSI, wheras non-English typists often prefer ISO due to the Alt GR key access, allowing for easier entry of accent symbols.
Other Keyboard Layouts
HHKB layout, inspired by the Happy Hacking Keyboard, features a very compact design with far fewer keys and optimized key placement for efficiency and comfort.

Apparently, the designers were inspired by historical keyboards, including the original Macintosh keyboard and the Sun Type 3.
Ergonomic layouts aim to reduce strain and fatigue by promoting a more natural hand position during typing.
Split keyboards separate the keyboard into two halves, allowing users to position each hand independently for improved comfort and ergonomics.
When choosing a layout, consider typing comfort, key spacing, and compatibility with your chosen keycap sets. It’s essential to select a layout that matches your preferences and won’t cause you physical pain from constant use!
Layout, and the number of keys, also impacts your firmware and the microcontroller, as we will see later.
Selecting Mechanical Switches
Mechanical switches are surprisingly fundemental to the success of a custom keyboard. They provide variety in tactile feedback, actuation force, and key travel distance.
Unlike cheaper membrane switches found in keyboards you might find bundled with your computer or sold in supermarkets, mechanical switches offer a more satisfying typing experience with distinct feel and audible clicks.
Common standards of mechanical switches include Cherry MX, Gateron, and Kailh.
Switches are categorized based on actuation behavior:
- Linear switches provide a smooth keystroke with no tactile bump or audible click, making them ideal for gaming and fast-paced typing.
- Tactile switches have a noticeable bump at the actuation point, providing tactile feedback without the need for a click sound.
- Clicky switches feature both a tactile bump and an audible click, offering a satisfying typing experience with tactile and auditory feedback.
- Low-Profile like Macbook keyboards, these are the opposite of chonky, and aim to have very short travel.
When selecting switches, consider factors such as typing feel, typing noise, actuation force, and switch lifespan as much as price and availability.
Choose switches that are compatible, match your typing preferences, and work for your intended use case.
Cherry MX Colours Quick Reference
The most commonly referred to switches are the Cherry MX standard, and they come in a variety of styles, named with colours, to suit any keyboardist’s preferences.
MX Red:
Linear and common. Smooth, minimal resistance, silent when pressed.
MX Black:
Like Red, linear, but higher actuation force.
MX Silver:
Designed for precision and speed. Short pre-travel for fast reaction times.
MX Brown:
Tactile, distinct bump when pressed. Some noise. More actuation force than Red, and higher pre-travel.
MX Blue:
MX Blue are the classic clicky switches. Distinct bump and traditional clicky noise. Strong feedback and actuation force.
MX Green:
Like Blue but feature a higher actuation force and more pre-travel.
MX Clear:
Silent switches for typists, tactile and have a slightly higher actuation force. These switches have a long pre-travel and are quiet so good for folks in an office.
MX Grey:
Similar to MX Brown switches, Grey are tactile and feature a strong actuation force, but are quiet.
Customizing Your Keycaps: Adding Personality to Your Keyboard
Keycaps are, along with the case, the most visible part of the keyboard, therefore they play a huge role in the overall aesthetics and feel.
They come in various materials, profiles, shapes, colours, and designs, allowing you to personalize your keyboard to match your personality or decor.
As well as colours, the fonts, legends, and designs help to create a unique and visually appealing keyboard setup.
- Commercially, they can be made out of ABS (Acrylonitrile Butadiene Styrene), the plastic that LEGO are made out of, and PBT (Polybutylene Terephthalate). ABS keycaps are smooth and shiny, while PBT keycaps have a textured finish and are more resistant to wear and shine.
- Custom “Artisan“, hand-made keycaps are often made out of resin, polymer clay, or are 3D printed.

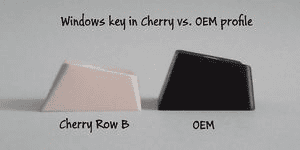
- Common keycap profiles include OEM, Cherry, DSA, and SA, each offering different key shapes and heights. OEM profile is the standard profile found on most keyboards, while Cherry profile traditionally has been extremely popular with custom keyboard builders, and features a lower height and sculpted key shapes for improved typing comfort.
Profiles are why you can’t just put any key anywhere on most traditional desktop keyboards, as the surfaces are often angled for ergonomics.
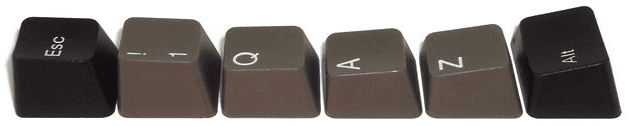
Remember, your keycaps and switches go together, so ensure your choices are compatible!
Can You Build a Cheap and Good Custom Keyboard?
Now you know the options available to you, let me demonstrate by example.
This is my daily driver custom keyboard, featuring all cheap off-the-shelf parts sourced from Aliexpress, and I am very happy with it.

Would it win any awards amongst the keyboardorati? No, but it suits my typing style, it was easy to assemble with no soldering, and was especially kind to my budget!
At the time, even though my old keyboard was old and starting to look like a science project, I wasn’t in the market. I was actually looking to buy cheap parts for my Sinclair Spectrum 128+2 keyboard replacement project (that I dubbed Speccyb).

Note I bought two sets of switches because my chosen layout has 67 keys, hence the name GMK67.
- Both Mac and PC compatible
- Bluetooth, 2.4G wireless, USB type-C
- RGB
- Rechargable
- Hot-swappable
- Media/volume knob
The only real complaint I have is that it is not custom programmable, but I made my own macro/number pad for that side of the fun!

My numeric keypad and macropad is a kit from Adafruit (for now), and it is capable of running KMK, but instead I used their libraries and some example code to make something custom.
Using the knob button I can select between numeric keypad and direction keys mode, which means I can use it for entering numbers to replace my missing numeric keys or I can use it as a jog control for my CNC to stop me straining my kneck when positioning the router on my material.

I will go into the code and how everything works in the next article about building a fully custom keyboard, but for now just understand that the macro/number pad is the easiest custom keyboard to create from scratch. This is because there are only a few keys, so each key can be assigned its own pin on the controller board, unlike a full keyboard where there usually would not be enough pins.
Assembling Your Keyboard
Building a custom keyboard involves several steps, starting with preparing the circuit board and components, soldering switches, installing stabilizers, mounting the PCB into the case, and then attaching your keycaps.

- Start by inspecting the PCB and components for any defects, bent pins, bad casting, or shipping damage. Ensure that you have nothing missing, including switches, stabilizers, keycaps, and screws. Time spent now will save you a lot of head scratching later! Ask me how I know …
- Stabilizers help prevent wobble and ensure consistent key feel across the keyboard. Apply lubricant to reduce friction and improve key stability. Test each to ensure smooth key movement and minimal rattle.
- If your keyboard is not “hot-swappable” then you will need to do some soldering. Use a soldering iron with temperature settings to solder switches onto the PCB. Each switch should be properly aligned and soldered to prevent connectivity or keypress registration problems.
- Mount the PCB into the bottom part of the case using screws or standoffs.
- Carefully insert the switches, being aware of placement and with enough force to mount them but not so much you bend the pins.

- Install keycaps onto the switches, ensuring that each keycap is properly seated and aligned.

Programming Your Keyboard: Tailoring Key Functions to Your Needs
Custom keyboard firmware programming allows you to customize your key functions, create macros, and adjust any RGB lighting effects.
Programming your firmware allows you to tailor the keyboard to your preferences and workflow, perhaps improving your productivity and efficiency, or maybe just for comfort.
To program your keyboard, download the appropriate firmware and follow the instructions provided. The code is written using a flashing tool to flash the firmware onto the keyboard’s microcontroller flash memory, so it is ready almost immediately after power-up.
- QMK is an open-source firmware that offers extensive customization capabilities, allowing users to define key mappings, macros, layers, and RGB lighting effects.
- VIA is a graphical firmware configurator that provides a user-friendly interface for programming and configuring custom keyboards. With VIA, you can easily remap keys, create macros, and customize keyboard settings without the need for re-coding or editing configuration files.
- KMK according to the project team is “a feature-rich and beginner-friendly firmware for computer keyboards written and configured in CircuitPython“. This means it is perfect for experimentation and iteration because, unlike other keyboard firmware, the code is human-readable in text files and easily tweaked and tested on the fly, with no compilation or flashing required.
Testing and Troubleshooting Keyboards
Once assembly and programming is complete, now is time to perform a typing test to ensure that all keys register correctly and that the keyboard functions as you intended.

Test each key combination in turn to verify what your computer receives is what you press and make any necessary adjustments or corrections before finalizing the assembly.
Building a custom keyboard can be a rewarding experience, but it may also come with challenges. It can be frustrating to have to take a bunch of keycaps and switches off so you can get inside the keyboard to hunt down issues, so taking time as you build will pay off at troubleshooting and testing phase.

Common issues include soldering errors, bent pins, bad switches, stabilizer rattling, and firmware configuration issues.

- To troubleshoot soldering errors, inspect the solder joints under magnification and re-solder any connections that appear weak or incomplete.
- Reduce stabilizer rattling by adding lubricant to the stabilizer wires and housings, and make sure everything is correctly fit for smooth key movement and minimal noise.
- Review the firmware documentation and double-check your configuration settings for accuracy.
- Fellow keyboard folks are often willing to offer advice and tips to help solve issues, don’t be afraid to reach out to dedicated forums such as Deskthority, Facebook Groups, Discords, on Github (for firmware help) or Reddit. Just make sure you tell them exactly what you are doing and what you already did or tried.
Next Up
This article has covered a lot and we still haven’t got to creating a complete and fully custom keyboard, or customizing/programming firmware, so we will look at that nex.
Make sure you are subscribed and following to make sure you do not miss it!


