• Skip to main content
  • Skip to header right navigation
  • Skip to site footer
makerhacks-logo

Maker Hacks

Ideas, news & tutorials for makers and hackers – Arduino/Raspberry Pi, 3D printing, robotics, laser cutting, and more

  • Home
  • About
  • 3D Printing
  • Laser Cutting
  • YouTube
  • Free Arduino Course
  • Recommendations
  • Contact
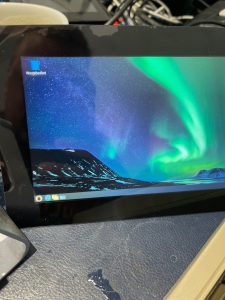
Rugged Raspberry Pi touchscreen with Aurora Borealis wallpaper, perfect for maker projects.

Raspberry Pi Touch Display 2 Review

You are here: Home / Electronics and Hardware / Raspberry Pi Touch Display 2 Review
FacebookTweetPin
Author: Chris Garrett

Raspberry Pi Touch Display 2 is easy to set up and just works. Check it out if you are in the market for a portable, crisp display

The Raspberry Pi Touch Display came out in 2015, and since then we have had to look to third-party companies to bring us anything more up-to-date. Not that the original isn’t good, it is, but it was starting to show its age.

Raspberry Pi Touch Display 2 Compared with Touch Display 1

Considering this is the new shiny, it does look a lot like the old one. Not a bad thing, but it is interesting that when they are switched off you can’t really tell them apart from the front.

1. Dual touchscreen devices connected with multiple cables on a cluttered electronics workspace.

This new version increases the screen resolution up to 1280 x 720 and has an integrated driver board. It costs around $60 over in the US or around £60 from UK suppliers such as Pimoroni or Pi Hut.

Raspberry Pi Touch Display 2 Specs:
Raspberry Pi Touch Display 2
  • Size: 7 inches (diagonal)
  • Resolution: 1280 x 720 (24-bit RGB)
  • Touch: 5-point multi-touch TFT LCD
  • Viewing angle: 85 degrees
  • Compatible with: All full-size Raspberry Pi models from the B+ onwards
  • Dimensions: 120.24 x 189.32 x 8.55 mm

Setting It Up and Using the Touch Display

The Raspberry Pi mounts onto the back of the touch screen, and now instead of a separate driver board, the display connects via a ribbon cable (both kinds are supplied).

Raspberry Pi Touch Display 2

Power is supplied via the GPIO pins. That does mean some hats won’t work quite as easily, though I am sure there are solutions for acquiring 5v from elsewhere on the Pi.

I tested it with a Raspberry Pi 5 and, after updating my OS, it immediately booted into portrait mode, which I then rotated in the settings UI.

Raspberry Pi upgrade alert screen with LabwC software, Arctic background, and multiple system options.

While the old screen doesn’t look bad, this new touch screen is more pleasing to look at, sharp, clear, and easy to read.

There is a new on-screen keyboard and poking, dragging, and stabbing the touch input is intuitive.

What’s It Like?

Pros:

  • Quick and easy to set up.
  • Just works (with updated OS).
  • Looks and works great.

Cons:

  • Uses GPIO for power (check for workarounds if you need those pins)
  • Feels fragile.
  • NVME can make assembly awkward.

Who Is This For?

While the vendors and Raspberry Pi org promote this as a tablet or an interactive display, I guess with the compact 7″ size and 720p resolution, the more likely main use cases will be home automation dashboards, 3D printer/CNC controllers, and bar-top arcades.

Conclusion

The Raspberry Pi Touch Display 2 is easy to set up and it just works, unlike a lot of other non-HDMI displays that I have tried that force you down a rabbit hole of Linux drivers and patches.

You are not going to be using this as your day-to-day arms-length laptop replacement because at 7″, it would be a strain on the eyes after a while, but if you need a nice, sharp, portable, touch-compatible screen, this is a great choice.

Want something bigger and more plug-and-play? Check out the official Raspberry Pi HDMI monitor that was recently released.

Check out the Pi Touch Display 2

Get all the up-to-date information and current pricing

Get More Details
Category: Electronics and Hardware, News and ReviewsTag: raspberry pi, Reviews
FacebookTweetPin

About Chris Garrett

Marketing nerd by day, maker, retro gaming, tabletop war/roleplaying nerd by night. Co-author of the Problogger Book with Darren Rowse. Husband, Dad, ?? Canadian.

Check out Retro Game Coders for retro gaming/computing.

☕️ Support Maker Hacks on Ko-Fi and get exclusive content and rewards!

Previous Post:EIBOS Polyphemus EIBOS Polyphemus Filament Dryer Review
Next Post:AtomStack Kraft Review: Innovative Combined Dual Laser EngraverHigh-resolution Atomstack Kraft laser engraver with neon glow lighting for precise DIY crafting.

Sidebar

  • Facebook
  • Twitter
  • Instagram
  • YouTube

Join the Newsletter

Sign up and get a free Arduino course + more!

Subscription Form

Recently Popular

  • xTool S1 Review
  • xTool P2 Review (first look)
  • IKIER K1 Pro Max Review
  • Gweike Cloud Review
  • How to choose the right 3D printer for you
  • Glowforge Review – Glowforge Laser Engraver Impressions, Plus Glowforge Versus Leading Laser Cutters
  • Flux Ador
  • Prusa i3 Mk3S Review
  • Best 3D Printing Facebook Groups
  • xTool D1 Pro Laser Cutter Review
  • Elegoo Mars Review – Review of the Elegoo Mars MSLA Resin 3D Printer
  • Glowforge ‘Pass-Through’ Hack: Tricking the Front Flap of the Glowforge with Magnets to Increase Capacity
  • How to Make a DIY “Internet of Things” Thermometer with ESP8266/Arduino
  • Wanhao Duplicator i3 Review
  • IKEA 3D Printer Enclosure Hack for Wanhao Di3
  • Creality CR-10 3d printer review – Large format, quality output, at a low price!
  • 3D Printed Tardis with Arduino Lights and Sounds
  • Anet A8 Review – Budget ($200 or less!) 3D Printer Kit Review
  • Make your own PEI 3D printer bed and get every print to stick!
  • Upgrading the Wanhao Di3 from Good to Amazing
  • How to Install and Set Up Octopi / Octoprint
  • Creality CR-10 S5 Review
  • Glowforge Air Filter Review
  • Thunder Laser Review

30 Days to Arduino

Arduino Tutorials
  • 3D Printing
  • CNC
  • Electronics and Hardware
  • Laser Cutting
  • News and Reviews
  • Software and Programming

arduino budget cad cnc diode laser glowforge Hacks Ideas laser cutter linux Makes making python raspberry pi resin Reviews technology tips xTool Lasers

.

Maker Hacks Blog Copyright © 2026 · All Rights Reserved · Privacy Policy