As a budget, pre-built printer, it is the printer I have recommended most.
Out of the box it is a good printer, but with a bit of effort and a few dollars you can make it amazing.
There are also some upgrades that are cool but not entirely necessary (though I would never stop anyone from tinkering, that’s half the fun!).
Let’s take a look at my experience, and you decide which you want to do. Deal?
Right from the start, I have to tell you two things …
- Get to know your printer first before attempting anything on this list. Dial in your settings. Get to know the slicer options and the outcome on your prints. Only then start working through modifications.
- I am appreciative of the Facebook group. I would have been stuck without them, and likely wouldn’t have purchased in the first place.
You would be well advised to stick around the Facebook group and get a feel for what others have done and are doing in addition to reading the list I made here, because this is just my experience. I did crowd source opinions on the best mods to work on before writing this.

The printing you do, and the machine you get, will be unique to you. Make sense?
That said, hanging around some in the groups can make you think the Di3 is a tricky machine. It’s not really. People have no more problems with the Wanhao than they do any other, probably less considering one of my more expensive printers took 11 months to get working right. Remember the communities are where people go to for help and to be inspired for upgrades.
This puppy is actually a good machine out of the box. What we are going to do is make it print like a machine literally four or more times the price.
Print Reliably
The first thing you are going to want to do is make your print success rate go up. 3D printing is a frustrating endeavour at times, and you want to put more of your energy into getting results than wanting to throw your machine out of the nearest exit.
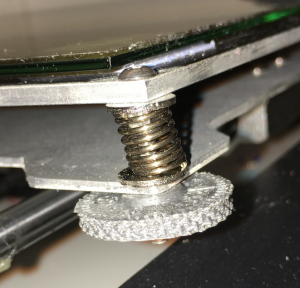
- Bed Levelling – The very next thing you need to do (after ensuring your frame and axis are now aligned, parallel and at 90 degree angles, obviously) is do the M3 Nylock locking nut and thumb wheel upgrade on the bed. See what works for you but this is how I have mine from top to bottom:
- M3 bolt head.
- Bed.
- Washer.
- First M3 nylock nut, tight.
- Spring
- Washer
- Aluminium bed carriage.
- M3 Thumbwheel
- M3 nut
- Glass/PEI surface – Good borosilicate glass beds give a true flat, level surface to print on. I added a PEI adhesive sheet to mine, or you can just go with a slab of PEI. Either way, you are going to want a non-warped surface, and you will want your prints to stick. My glass is held on with 3M thermal pads, they are sticky when warm and allow the glass to be removed when cooled – no binder clips :)

Sticky thermal pads for gripping the glass
Print Better
Next up we have quality changes (not to say the base machine is bad!). This is probably the area of greatest debate, but after printing way too many Benchys, I can tell you my machine now prints every bit as good (or maybe better) than my legit Prusa Mk2. I am amazed how well this guy prints, seriously.
- Remove Spring Belt Tensioners – The printer comes with springs that are meant to keep the X-Axis belts nice and tight, unfortunately instead springy belt tensioners cause springiness. Get rid of them and just use zip ties to keep the belts tight instead.
- Tweak Acceleration and Jerk – If you still get a lot of ringing/artifacts/lines it could be because of backlash caused by the machine trying to throw the hot end around too fast. (As pointed out by ThatOnePerson on Reddit, Make sure you save to EEPROM else it won’t stick)

Configuration 
Acceleration 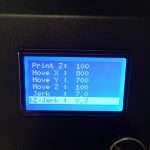
Jerk = 7 
X = 800, Y = 700
- Duplicator 4 Drive Gear – For some reason the drive gear that came with my Wanhao Di3 was just … wrong. It slipped, it wasn’t finely ridged. It worked but … just bad. So someone suggested I use a gear from the big brother to the Di3 and what do you know, it printed waaaay better.
- Flex Couplers – Again, this is an attempt to remove lines/wobble/artifacts. Out of the box, the Wanhao and it’s rebadged family arrive with rigid couplers that attach the Z Axis stepper motors to the vertical threaded rods. If there is any misalignment, flex or wobble, this can transfer to the prints as lines and ridges. Flex Couplers, on the other hand, absorb some of the vibration and unfortunate offset movement from the threaded rods.

Flex Couplers are cheap but effective


Performance Enhancement
Now we get to optional but great modifications and additions. These things allow you to print with super powers :)
- Z-Brace – Add rigidity and print way faster. It’s a lot of parts and printing, and you need to set some time aside, but if you want to push the printer to its limit, this is something a lot of people recommend. Get the details here.

The Z Brace makes the printer rock solid - Micro Swiss All Metal Upgrade – The Micro Swiss all-metal upgrade allows you to print pretty much anything on this printer. No PTFE liner (unlike some “all metal” hot ends). Tough nozzle + all metal means whatever heat or abrasive you throw at it, this guy can handle, and beautifully.
- IKEA Enclosure for ABS Printing – I can’t tell you the difference adding this cheap and easy enclosure made to my ABS printing. My Wanhao Di3 is my go-to ABS machine – it has ABS in it right now. With PEI and the enclosure I can print pristine ABS models as easy as PLA.

Summary

The picture above is of the final Benchy after printing about a dozen of the things. Modding and tweaking. As you can see from the base, there were still some slicer changes I needed to make and I could have gotten my z gap more dialled in, but the machine itself worked admirably.
This isn’t about my printer though, it’s about you getting the most out of yours. As I state above, get to know your machine before doing anything. Tweaking your slicer settings is going to pay dividends before you do any modifications to the machine itself. Out of the box it is an extremely good value for money piece of equipment. Upgrades should be done in the order and pace that works for your needs!