• Skip to main content
  • Skip to header right navigation
  • Skip to site footer
Maker Hacks

Maker Hacks

Ideas, news & tutorials for makers and hackers – Arduino/Raspberry Pi, 3D printing, robotics, laser cutting, and more

  • Home
  • About
  • 3D Printing
  • Laser Cutting
  • YouTube
  • Free Arduino Course
  • Recommendations
  • Contact
xtool d1 pro

xTool D1 Pro Upgrades – Taking a Good Laser Engraver to Great Laser Cutter

You are here: Home / Laser Cutting / xTool D1 Pro Upgrades – Taking a Good Laser Engraver to Great Laser Cutter
FacebookTweetPin
Author: Chris Garrett

The XTool D1 Pro came out well in my recent comparison of laser cutters. In this article, I am going to share two upgrades that take it from being a good laser engraver to being a great laser cutter …

XTool Laser Bed Upgrade

Today I am going to share two upgrades and the first is vital regardless of if you are engraving or if you are cutting.

As the XTool comes by default, you must put a waste board underneath the material you are working with so that you don’t miss or burn through and damage your work surface (in my case I need to take extra special care because that surface is my rented office carpet!).

Rather than just stick a piece of MDF under the XTool gantry, I purchased a proper laser bed.

XTool Official Honeycomb Laser Bed 
from Amazon
XTool Official Laser Bed with Honeycomb

The XTool branded “Honeycomb” bed at £159 from Amazon this is NOT cheap, and of course one of the selling points of a diode over a Co2 laser is price, but I feel like it is a great upgrade.

First, as mentioned it protects from misfires (or fires!), but more importantly given the next upgrade, it helps your XTool cut cleanly and more efficiently by raising up your workpiece, reducing grimy looking cuts due to flashback.

XTool Engraving to Cutting

While my 10W XTool laser is able to cut without this next upgrade, it can cut better and more cleanly with this than without it.

This upgrade is the XTool air assist.

XTool Air Assist Diagram

Again, it is not cheap. You could get an aquarium pump to do the same job as the compressor in the kit, but you would still need to direct the air flow to the right place, which is where the special nozzle comes in.

An air assist blows smoke and soot out of the way of your laser, giving your cut more power and with reduced residue. This means you need to not use as much masking tape or do as much post-processing such as cleaning or sanding.

Results

Results of XTool Upgrades

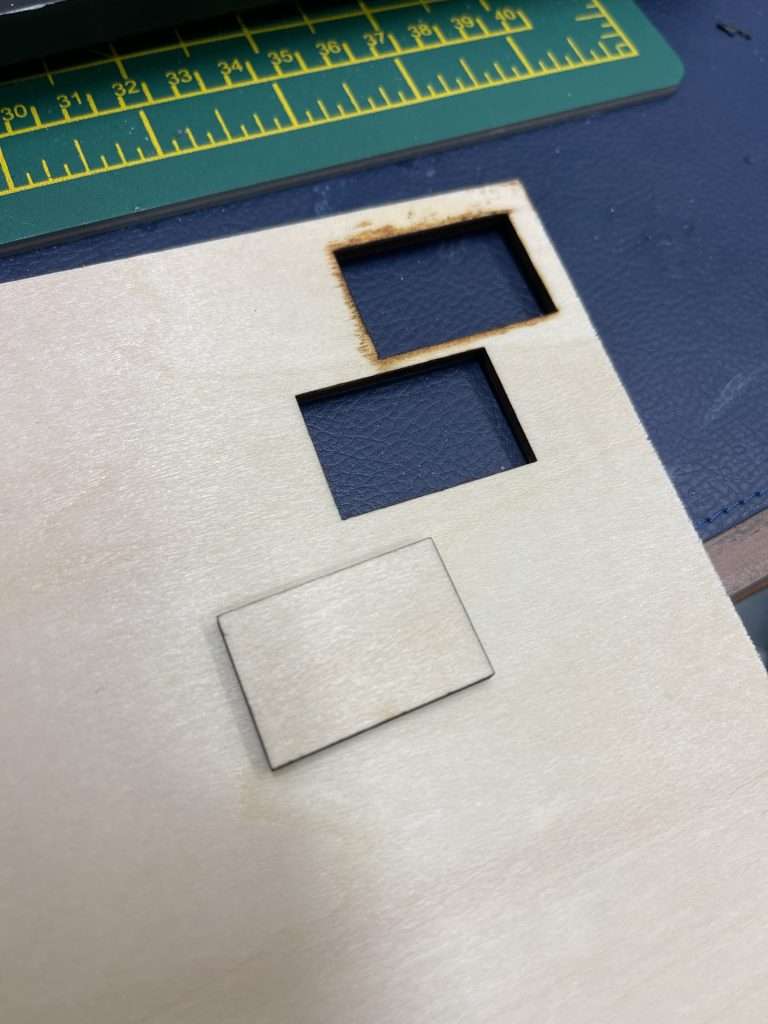
As you can see, combined these two upgrades provide great results. I can cut cleaner and quicker, or cut thicker materials without needing to upgrade the laser itself.

Enclosure

At the time of writing this article my laser was open which meant even with fans blowing, window open, and a room air purifier, it was not ideal to work in the same room as the laser. I bought ab official xTool enclosure, even though I could have bought a cheaper alternative or made one. I just didn’t have time.

I could still create a tutorial for making an enclosure with Ben’s help – Let me know if you have any ideas on that!

Future Upgrades

There is an upgrade I would still like to do. I would love to test a 20W laser. After seeing what this 10W can do I am very curious!

Related

Category: Laser CuttingTag: Reviews, xtool
FacebookTweetPin

About Chris Garrett

Marketing nerd by day, maker, retro gaming, tabletop war/roleplaying nerd by night. Co-author of the Problogger Book with Darren Rowse. Husband, Dad, 🇨🇦 Canadian.

Check out Retro Game Coders for retro gaming/computing.

☕️ Support Maker Hacks on Ko-Fi and get exclusive content and rewards!

Previous Post:Comparing the xTool D1 Pro, Gweike Cloud and Glowforge Laser Engravers
Next Post:Gweike Cloud CO2 Laser Cutter ReviewGweike Cloud

Sidebar

  • Facebook
  • Twitter
  • Instagram
  • YouTube

Recently Popular

  • xTool P2 Review (first look)
  • Gweike Cloud Review
  • How to choose the right 3D printer for you
  • Glowforge Review – Glowforge Laser Engraver Impressions, Plus Glowforge Versus Leading Laser Cutters
  • Prusa i3 Mk3S Review
  • Best 3D Printing Facebook Groups
  • xTool D1 Pro Laser Cutter Review
  • Elegoo Mars Review – Review of the Elegoo Mars MSLA Resin 3D Printer
  • Glowforge ‘Pass-Through’ Hack: Tricking the Front Flap of the Glowforge with Magnets to Increase Capacity
  • How to Make a DIY “Internet of Things” Thermometer with ESP8266/Arduino
  • Wanhao Duplicator i3 Review
  • IKEA 3D Printer Enclosure Hack for Wanhao Di3
  • Creality CR-10 3d printer review – Large format, quality output, at a low price!
  • 3D Printed Tardis with Arduino Lights and Sounds
  • Anet A8 Review – Budget ($200 or less!) 3D Printer Kit Review
  • Make your own PEI 3D printer bed and get every print to stick!
  • Upgrading the Wanhao Di3 from Good to Amazing
  • How to Install and Set Up Octopi / Octoprint
  • Creality CR-10 S5 Review
  • Glowforge Air Filter Review
  • Thunder Laser Review
  • 3D Printing
  • CNC
  • Hardware
  • Laser Cutting
  • News
  • Retro Computing
  • Software

amiga amos arduino basic programming budget buying cad cnc commodore corexy c programming creality crypto doctor who emulation esp32 esp8266 filament glowforge gweike Hacks Ideas kids lighting linux Makes making Monoprice Parts pc props prusa python raspberry pi ratrig resin Reviews robots software sounds technology tips upgrades wanhao xtool

.

Maker Hacks Blog Copyright © 2023 · All Rights Reserved · Powered by Mai Theme