
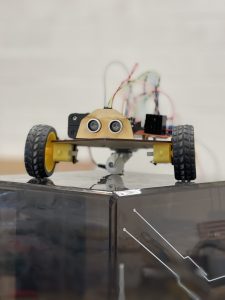
A while ago, I bought a whole bunch of these cheap robot kits. They come with a couple of the popular yellow motors and a little battery box.
I created a 3D-printed little robot chassis, and that worked quite well. But I kind of put it to one side, as I wasn’t going to do any in-person workshops (that worldwide health issue put a stop to this).
My interest was sparked again because I saw Kevin McAleer had created a laser-cut robot chassis. So, I cut one out, and that’s what we’re going to look at today.
Laser Cutting the Chassis
The laser cutter I’m using is the Creality Falcon 2 Pro, and my version has 60 watts of power, which is a lot more than you need for this. I think Kevin used something like 5 watts.
The nice thing about this is that it’s fully enclosed. As well as being super powerful, it also has the option of cutting down the power.
I really should have cut it with lower power to match the settings Kevin used because my chassis came out a little wobbly. The spot size of the 60-watt laser is a lot bigger than Kevin’s 5-watt, so I could have adjusted the kerf or cut down the power.
This laser is a really nice size for doing robots. It’s compact, sits on the desk, has a lot of power, and is really easy to use. You can usually get it at a really good price.
Bill of Materials
Now, we need to look at the materials. The below ingredients are required:

- Obviously, you need some wood for your laser cutter. Kevin specified 2mm plywood which is great for a robot, especially for a little, lightweight robot such as this.
- You need two wheels.
- You don’t need to get a branded Arduino; I got a cheap one, and they work just as well. It’s really good to have a cheap one because I tend to fry them and have to throw them away.
- You need a battery box. He says four AA batteries, but I found that wasn’t enough juice for me. I had to go up to an 8-battery box (8 x 1.5V = 12V), and that seemed to be just enough for it to work and be able to haul itself around.
- You need some standoffs for the Arduino. I’ve got these plastic ones, and some came with the kit.
- You need an HC-SR04 ultrasonic distance sensor.
- You need two hobby motors.
- You need a motor driver. I use the L298N.
- You need some jumper wires.
- He doesn’t mention it here, but obviously, you need to screw it all together, so you’ll need a screwdriver.
Now that we’ve got all the parts, we just need to screw it all together.
Circuit Diagram

I am using the following pins as in the diagram above:
- Pins 2 and 3 for the Left Motor control
- Pins 4 and 5 for the Right Motor control
- Distance sensor trigger on A0
- Distance sensor echo on A1
Speed control is on the PWM pins 9 and 10 but speed control is optional.
Arduino Code
Here is my example code for an obstacle-avoiding robot. It is very basic, enough to make the robot reverse and turn when it encounters an object, but it easily gets stuck because it always reverses and turns by the same direction and amount!
// Ultrasonic library
#include <HCSR04.h>

// Motor control pins
int leftMotorpin1 = 2;
int leftMotorpin2 = 3;

int rightMotorpin1 = 4;
int rightMotorpin2 = 5;

int trig = A0;
int echo = A1;

//Define pins (trig,echo)
UltraSonicDistanceSensor distanceSensor(trig, echo);

//Variables
int distance;


void setup() {


  // Speed (0  = off and 255 = max speed):
  analogWrite(9, 50); //ENA  pins
  analogWrite(10, 50); //ENB pinss

  // For testing the distance
  Serial.begin(9600);

  // put your setup code here, to run once:
  pinMode(leftMotorpin1, OUTPUT);
  pinMode(leftMotorpin2, OUTPUT);
  pinMode(rightMotorpin1,  OUTPUT);
  pinMode(rightMotorpin2, OUTPUT);

  // speeds
  pinMode(9,  OUTPUT);
  pinMode(10, OUTPUT);

}

void turnLeft() {

  digitalWrite(leftMotorpin1,  LOW);
  digitalWrite(leftMotorpin2, HIGH);

  digitalWrite(rightMotorpin1, LOW);
  digitalWrite(rightMotorpin2, HIGH);

}


void turnRight() {

  // Left
  digitalWrite(leftMotorpin1,  HIGH);
  digitalWrite(leftMotorpin2, LOW);

  // Right
  digitalWrite(rightMotorpin1, HIGH);
  digitalWrite(rightMotorpin2, LOW);

}


void backwards() {

  // Left
  digitalWrite(leftMotorpin1,  HIGH);
  digitalWrite(leftMotorpin2, LOW);

  // Right
  digitalWrite(rightMotorpin1, LOW);
  digitalWrite(rightMotorpin2, HIGH);

}


void forward() {

  // Left
  digitalWrite(leftMotorpin1,  LOW);
  digitalWrite(leftMotorpin2, HIGH);

  // Right
  digitalWrite(rightMotorpin1, HIGH);
  digitalWrite(rightMotorpin2, LOW);

}


void allStop() {

  // Left
  digitalWrite(leftMotorpin1,  LOW);
  digitalWrite(leftMotorpin2, LOW);

  // Right
  digitalWrite(rightMotorpin1, LOW);
  digitalWrite(rightMotorpin2, LOW);

}

void loop() {


  // Get the distance
  distance = distanceSensor.measureDistanceCm();

  // Print distance to serial
  Serial.print(distance);
  Serial.println("cm");

  if(distance > 15)
  {
    forward();
    delay(1000);
  }
  else
  {
    allStop();
    backwards();
    delay(500);
    turnRight();
    delay(500);
  }

  // wait a bit
  delay(100);
}
Thanks to Kevin for the design and the inspiration! Check out his YouTube channel @kevinmcaleer28


