
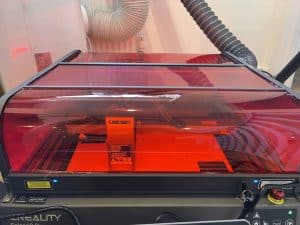
The Creality Falcon 2 Pro 60W diode laser is one of the most powerful diode lasers on the market. It is certainly the first enclosed desktop unit I have seen with this much power.
Yes, you read that correctly, it features a 60W diode laser.
I was sent this to get my honest opinion on it, and I have not been paid or instructed what to say. As always, I aim to provide a fair and honest review.
Let’s take a look at the features, performance, and whether this machine is worth your investment.
Creality Falcon 2 Pro 60W Overview
The Creality Falcon 2 Pro 60W diode laser is an update and upgrade from their previous 20W and 40W models.
Unlike most of the lasers that Creality sells, the Falcon 2 Pro 60W is fully enclosed with a red-tinted plexiglass cover, allowing you to monitor the laser’s progress safely and helping to keep your lungs free of smoke and smells.

The machine is Class 1 certified, meaning you don’t need to wear safety goggles while it’s in operation, although I would still keep kids or pets from poking around.
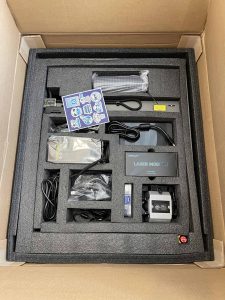
It also includes an emergency stop button that immediately halts operation in case of emergencies and a key lock to prevent unauthorized use.
While not a complete DIY kit, it arrives flat-packed to save on shipping costs, so you do have to put it together yourself by bolting together the pre-assembled modules and adding the red safety plastic.
Although the build is straightforward, the flexible plastic cover is springy so can have a mind of its own. You will find it pops out as you insert it. Keep pets and kids away from it even when switched off otherwise you will need to fight it back into position.
Design and Features
The Falcon 2 Pro 60W has a nice, modern design. It is mostly metal, and adds a riser and lid to the original open gantry design of the Falcon.
Having a sliding “bread bin” style door for access is nice for keeping things compact. Ideal if you’re working in a smaller area as it doesn’t require vertical clearance above the machine like a hinged lid would.

On the front panel are buttons for homing, framing, and play/pause, but most people are going to control it via LightBurn instead.
While the machine comes with an air assist, it is a basic aquarium pump so you might want to upgrade later. Still, it is bundled in the package and it does the job.
You can control the exhaust fan and interior lighting with switches on the sides, which is a nice touch.
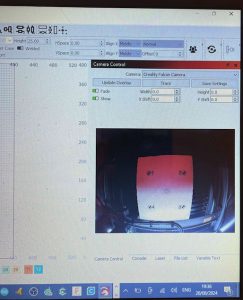
One of the key selling features is the built-in wide-angle camera, positioned centrally inside the lid of the machine. Once you have dialed in the calibration, the camera will make positioning cuts easier.
For me, I found getting my computer to detect the camera required swapping out a USB cable and specifying the COM port of the laser in LightBurn, but that might be a me thing.
While the LightBurn calibration is quite fiddly and is not an immediately intuitive process, you can also pick from some presets if you can’t be bothered and are ok with a drop in accuracy.
I heavily rely on the framing feature, which I find gives me a better idea of where things will land even though the laser module casing can obscure where the laser beam is positioned. As you will see later in this review, it turns out there is a way to make things much easier.
Rather than a honeycomb bed, this machine came with removable slats. It tends to be a matter of personal debate which is preferable, though finely cut pieces tend to fall through slats so keep that in mind.
Speed is ok at 400mm/second, but that is below the xTool S1 and less than half of the Ikier K1 Pro Max.
A pull-out tray makes removing debris easy but sadly you can’t use that feature as a pass-through for larger workpieces because of the lack of focus z movement.
With the added enclosure the machine is an upgrade over the open design of previous Creality lasers, but in doing so without allowing for this use-case they have lost the ability to work on bulkier projects.
So What Can 60W Do? Creality Falcon 2 Pro Performance
What most people will really want to know is how well this laser cutter performs beyond the norm.
With 60W of power, the Falcon 2 Pro is designed for serious cutting, and it does that well.
Don’t be misled by the 60W number, however.
Due to the nature of how diode laser cutters work, this 60W of power is made up of multiple elements combined to output 60W in aggregate.
This means the dot size of the laser in 60W is chonkier than you might be hoping for, and it means the leap from 40W to 60W is not as huge as we would like, and is not comparable to what you would see with 60W of CO2 power.
It is still a LOT of power in a diode machine, though!
How does it perform for detailed engraving? The laser head has three modes: Precise (22W), Normal (40W), and Powerful (60W), which you can select manually depending on your needs. I would have liked to have had control via software, but this works too.
As you would expect, the machine’s precise mode works better for fine engravings, while the Powerful mode is best for cutting thicker materials.
Even better, Creality obviously recognizes that the Falcon 2 Pro even on 20W power isn’t the very best at engraving fine details, so they include a 1.6W laser module for free!
This low-powered module is perfect for those who need to do precise, detailed engraving work, offering a super fine laser point.
Unfortunately, now we have come to a harsh limitation of the machine. It does NOT have autofocus, or really any fine-tuned focus control at all.
To focus the Creality Falcon 2 you have to use a small physical block that you wedge under the laser unit, then you tighten thumb screws. Sadly, as soon as you pull out the block the whole thing sags, throwing off your focus anyway.
Testing and Cut Results
I started my tests with engraving.
Using the 60W mode at 10% power, I achieved decent results on plywood, but the engraving was a bit light. Upping the power to 20% gave me a much better outcome, though some charring occurred, which I can easily mitigate using masking tape.
At full power, you are not going to use it for high-detail work but it is a nice option for thick engraves and scores versus defocusing.

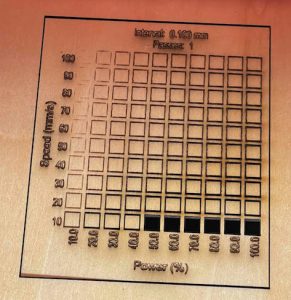
For cutting, I tested various scrap woods, including walnut, basswood, birch, and poplar. ¼ inch thick plywood with 60W at 100% power didn’t cut all the way through in one pass until I dropped the speed down to 10 mm/sec or below.
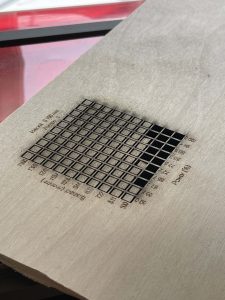
The most impressive test was with 3/4″ plywood. With very careful focusing, speed set to 2 mm/sec, and 100% power, I managed to cut cleanly through in a single pass.
I did try thicker and denser materials but all they resulted in was a test of the smoke and fire detection!
That said, if you are mainly using basswood, poplar, maple, birch, dark acrylic and MDF, I think you will have a great time with this machine.
Conservative Settings (One Pass):
Different pieces of material can vary even with dialled in settings, but I found the following worked for me with good focus.
| Material | Thickness (Inches) | Speed (mm/min) |
| Basswood | 1/8 | 700 |
| Basswood | 1/2 | 150 |
| Black Acrylic | 1/4 | 180 |
Pros and Cons
You won’t be disappointed if you buy this machine. That said, there are absolutely some pros and cons that you should be aware of.
And there is one feature that I have never seen before on any machine up until now.
| Pros | Cons |
|---|---|
| Swappable 60W power LED head + Bonus fine laser | Manual focus using a focusing block |
| Enclosed with exhaust, rolling lid | Flexible enclosure plastic |
| Air assist | Slower compared to competition |
| Pull-out crumb tray | Camera calibration process |
| Camera and LED lighting | Price on the higher end considering work area, speed, and lack of autofocus |
| Air and fire warnings + unique feature – it tells you when the lens is dirty |
Are any of those cons a deal-breaker? I would say no, at least if you have the budget.
Improving Positioning with Crosshairs and Red Dot
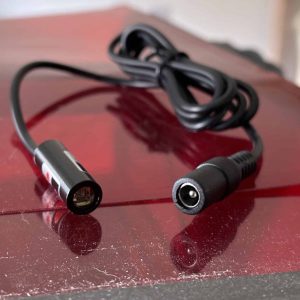
I mentioned that the camera, while welcome, is not the main way I like to prepare my material layout. What would be really nice is a red dot or crosshair, right?
Thinking I was being smart, I ordered a crosshair LED laser from Amazon. It was under £10 and runs off 5v, which is handily available on the top of the diode laser module (mainly for updating the module firmware).
Knocking up a quick holder in LightBurn, I cut it out of some thick plywood and stuck it to the top of the laser head with a piece of spare double-sided tape from my CNC projects.
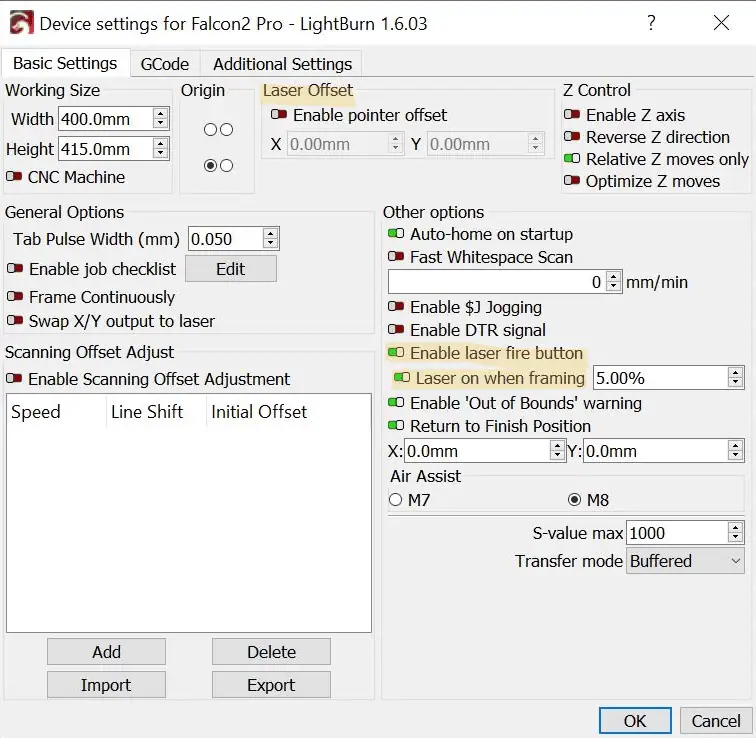
In LightBurn you can set the offset of your red dot laser, so I made a target score and then measured using the built-in measuring tool from where the laser was positioned to where the drawing sat.

After a couple more tests I had it pretty much perfect. Hurrah!

All well and good, but then I heard from Jorgen Eriksson in the Creality Falcon Facebook Group that LightBurn includes a feature where you can run the laser in low power while framing – essentially an already built-in red dot pointer with no offsets needed!
Creality Falcon 2 Pro 60W Review Final Thoughts
So, is the Creality Falcon 2 Pro 60W worth it? Yes!
It is priced higher than the highly regarded xTool S1, at the time of writing, which has a larger work area and also has swappable laser heads, although that maxes out at 40W currently. I wonder if this price will position it against even budget eBay CO2 lasers or the amazing xTool P2.
That said, if you’re looking for a powerful, compact, enclosed laser that can handle a variety of materials, this machine is a great choice. Just remember to focus properly and use multiple passes for the best results, especially when cutting thicker materials.
While this Creality unit excels at cutting, it can do fine engraves, especially when using the included 1.6W laser module.
If you found this review helpful and decide to purchase the Falcon 2 Pro, consider using my affiliate link below. It won’t cost you anything extra, but it does help support this site and helps me keep bringing you unbiased reviews.
.


