• Skip to main content
  • Skip to header right navigation
  • Skip to site footer
  • YouTube
  • MakerWorld
  • Instagram
  • Threads
  • Bluesky
  • Mastodon
  • Facebook
makerhacks-logo

Maker Hacks

Ideas, news & tutorials for makers and hackers – Arduino/Raspberry Pi, 3D printing, robotics, laser cutting, and more

  • Home
  • About
  • 3D Printing
  • Laser Cutting
  • CNC
  • Programming
  • Free Arduino Course
  • Free Robotics Course
  • Recommendations

Infrared Sensor

You are here: Home / Robotics Course / Infrared Sensor

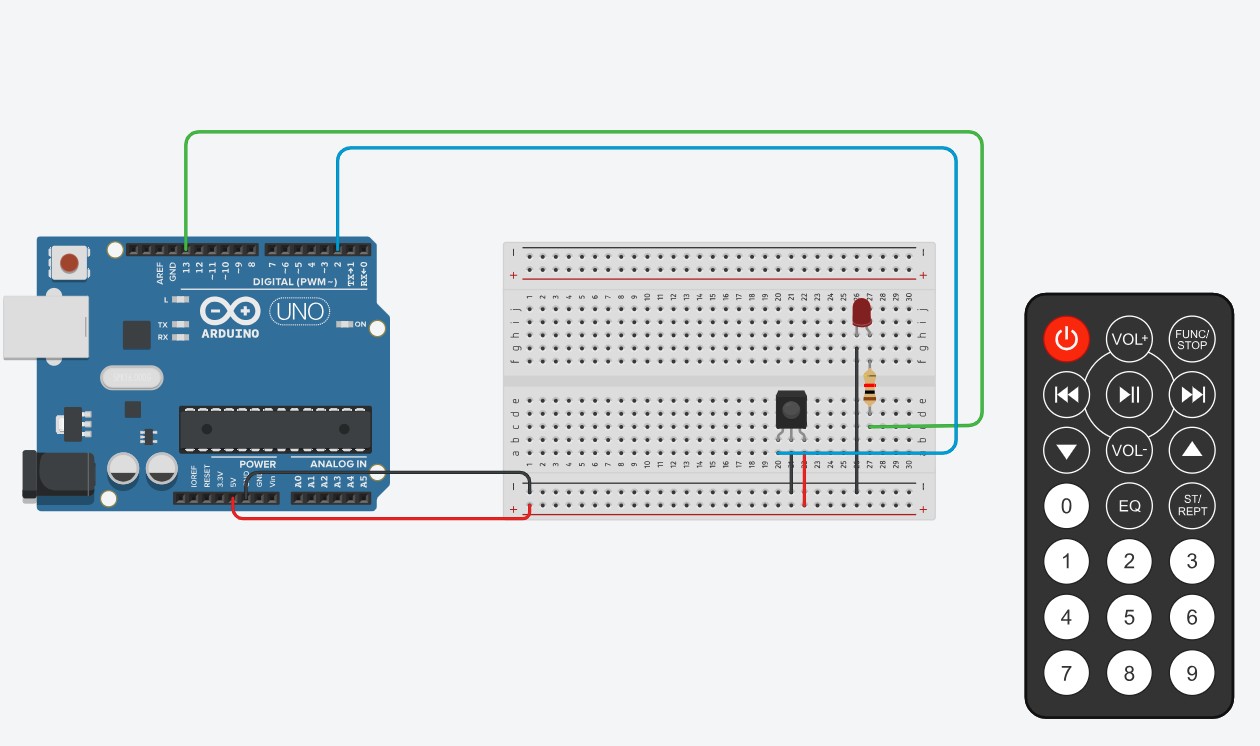
In this lesson,  we will use the ubiquitous Infrared Receiver and remote control to send signals to our Arduino Uno.

When we get a signal we will blink an LED and output the signal code to the serial monitor so we can record it for later interpretation.

Code

/*
 Read an IR remote and print the code for each button.

 IR receiver: signal to pin 2, plus 5V and GND.
 Written for version 4 of the IRremote library
 (install it from the Library Manager).
*/

#include <IRremote.hpp>

#define RECV_PIN 2

void setup()
{
  Serial.begin(115200);

  // Start the receiver. ENABLE_LED_FEEDBACK flashes
  // the built-in LED (pin 13) whenever a signal arrives.
  IrReceiver.begin(RECV_PIN, ENABLE_LED_FEEDBACK);

  Serial.println("Ready: point a remote at the receiver and press a button");
}

void loop()
{
  if (IrReceiver.decode())
  {
    // One line per signal: protocol, address and command
    IrReceiver.printIRResultShort(&Serial);

    // The command is the short code we use to recognise
    // each button in the remote control lesson
    Serial.print("Command: 0x");
    Serial.println(IrReceiver.decodedIRData.command, HEX);

    // Get ready for the next signal
    IrReceiver.resume();
  }
}

Previous Changing Direction with Tank Turning – L298n Breakout and Two MotorsCourse contentsNext IR Remote Control

Robot Course Lessons

  • Introduction
  • Choosing a Brain for your robot
  • Motors and Actuators
  • Basic Motor Controllers
  • Sensors
  • Breadboards, Batteries, Chassis, Wheels and Wires
  • Introduction
  • Basic DC Motor Movement
  • Forward and Reverse with Servos
  • Controlling DC Motors with the L293D H-Bridge Chip
  • Using Motor Drivers, Shields and Breakouts
  • Stepper Drivers
  • L298N Breakouts
  • Changing Direction with Tank Turning – L298n Breakout and Two Motors
  • Infrared Sensor
  • IR Remote Control
  • Robot Chassis
Creative Commons Attribution-ShareAlike 4.0 licence

Free to use, adapt and share. This course by Chris Garrett, Maker Hacks, is licensed under Creative Commons Attribution-ShareAlike 4.0. Workshops, schools and clubs are welcome to use it, including in your own handouts and sessions. Just credit “Chris Garrett, Maker Hacks (makerhacks.com)” with a link to the lesson, and share any adapted versions under the same licence. Embedded videos and other people’s content keep their own terms.

Improved a lesson or spotted a mistake? I would love to hear about it: get in touch.

  • 3D Printing
  • CNC
  • Electronics and Hardware
  • Laser Cutting
  • News and Reviews
  • Software and Programming

arduino budget cad cnc diode laser glowforge Hacks Ideas laser cutter linux Makes making python raspberry pi resin Reviews technology tips xTool Lasers

  • YouTube
  • MakerWorld
  • Instagram
  • Threads
  • Bluesky
  • Mastodon
  • Facebook

.

Maker Hacks Blog Copyright © 2026 · All Rights Reserved · Privacy Policy